Shortcuts for Microsoft Office!
Creative solutions for microsoft office, print a key assignment list in word, print a key assignment list in word for shortcuts.
If you have customized Word with shortcut key assignments for commands, macros or styles, you can print a key assignment list of those shortcuts. Depending on your version, follow these steps. (Note the other options for printing here such as AutoText Entries as well):


Word 2010 and above:
- Press Ctrl+P to display the Print option selected at the left side of the page.
- Click the drop down arrow under the Settings category and choose Key Assignments .
- Click the Print button at the top of the page.

Print a Key Assignment List in Older Versions of Word
- Press Ctrl+P . Word displays the Print dialog box.
- In the Print What box, select Key Assignments .
- Click on OK .

This is a great timesaver when you use a program regularly!
Don’t Know How to Customize Shortcut Keys?
If you like the idea of having and printing out key assignments but don’t know how to create keyboard shortcuts for your favorite commands, here’s a short tutorial:
Create Keyboard Shortcuts for Ribbon Commands (Word 10 and above)
Not all available commands are displayed on the ribbon as there is just not enough room but every command is accessible by customizing the ribbon.
Access the Customize Keyboard Shortcuts feature:
- Right click anywhere on the ribbon
- Choose Customize the Ribbon
- Click the Customize button at bottom in Keyboard Shortcuts :
The Customize Keyboard dialog box displays and you can scroll through the Tabs on left and choose the desired Command on the right.

- When the desired command is displayed any previously assigned shortcuts will display in the Current keys : box. You can make note of it and use that key combination or create your own.
- Create your own shortcut by pressing the keys you want to use for a shortcut. in the Press new shortcut key: box at right.
NOTE : Most letters are already in use in Windows and/or Word when combined with the CTRL key. For instance, CTRL F is Find. If you replace that shortcut with one of your own, you are overwriting the previous shortcut. If you want to keep the common shortcuts, just add SHFT so a shortcut could be CTRL SHFT + a letter.
TIP : You can also use the function keys (F1 – F12) as well as the CTRL, SHFT and ALT keys as shortcut assignments. (You can also add CTRL and/or SHFT here as well).
You can also use the TAB and UP and DOWN Arrow keys to move through the command dialog boxes to select Categories and Commands.
Want more fast ways to get your documents done in Word? Visit this post…
Remove Formatting from a Word Document
Let me know if you have questions or have some ways you have Word work for you!
Leave a Reply Cancel reply
Your email address will not be published. Required fields are marked *

- Real Estate
Home » Business » Printable Key Log Template (Excel, Word, PDF)
Printable Key Log Template (Excel, Word, PDF)
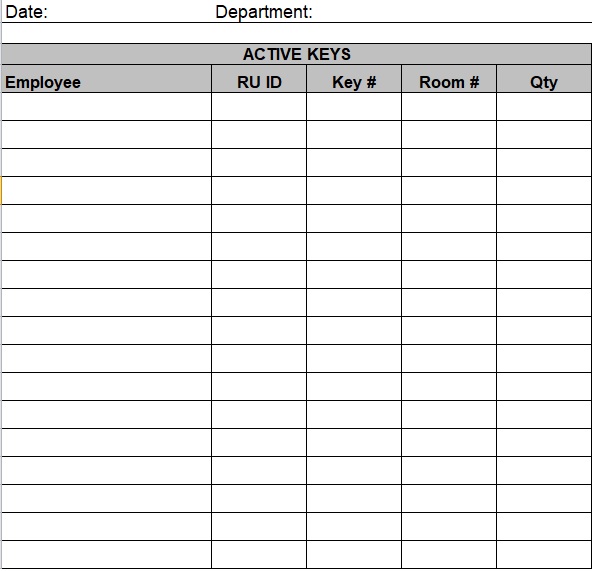
The key log template helps you to keep a track of key issuances and returns, and other necessary information. Keys are very important devices in any organization or business because they are used to access all departments that a company has. Moreover, the key log is a document that is used to track and monitor all the keys that a certain organization has.
In addition, the key log template also consists of a page that has various sections for providing information about the issuance of keys. It allows you to include the following information;
- Name of a person
- Date and time of issuance of keys
- Signature of a person who has approved the document.
However, with the help of a key log, you can easily find out the key. It also prevents you from misplacing keys. It assists you to keep a track of a number of keys on a daily, weekly, or monthly basis. You may also like Vehicle Log Book Template .
Table of Contents
Who can use a key log?
A key log can be used by many companies, hotels, institutes, and building management to remember the location of a key. Many large scale industries such as companies or organizations use it for their transportation system.
How do you make a key log?
Here are 5 steps that you can follow for making a key log ;
Firstly, make a table that contains various rows and columns. You can also download a key log template from the internet.
Secondly, write the title at the centre of your document.
After that, enter the information in the table like key serial number, location of the lock, date and time of key issuance, name of a person, and his/her signature.
Next, write the date and time that when the keys have returned by a person.
At the bottom of the document, write the name of the person who has approved a log. Also, leave a space for his/her signature.
What are the functions of key log templates?
Functions of key log templates are discussed below;
- When you are formatting your document then the key log template is a helpful tool that is used as a reference.
- A well-made key log template enables you to effectively monitor and track several keys that are going in and out of a certain department.
- Most importantly, it provides you simplest way of making your document.
- Furthermore, if you use this template then you have assured that you have included all important information needed in a key log. You should also check the Truck Driver Log Book Template .
Printable Vehicle Key Log Template
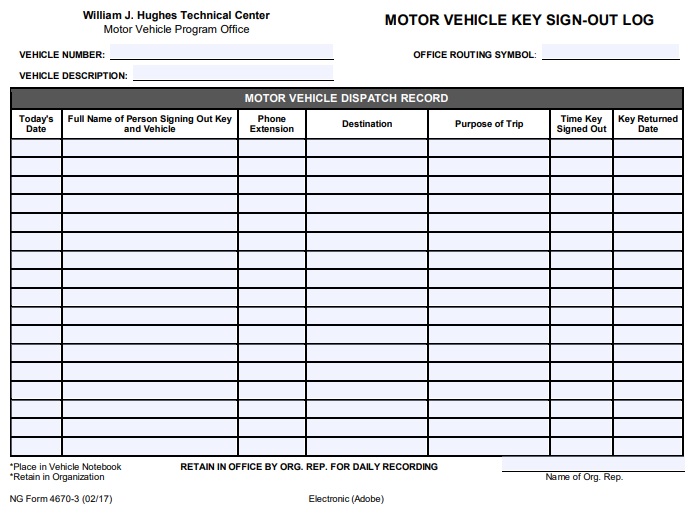
Office Key Log Template
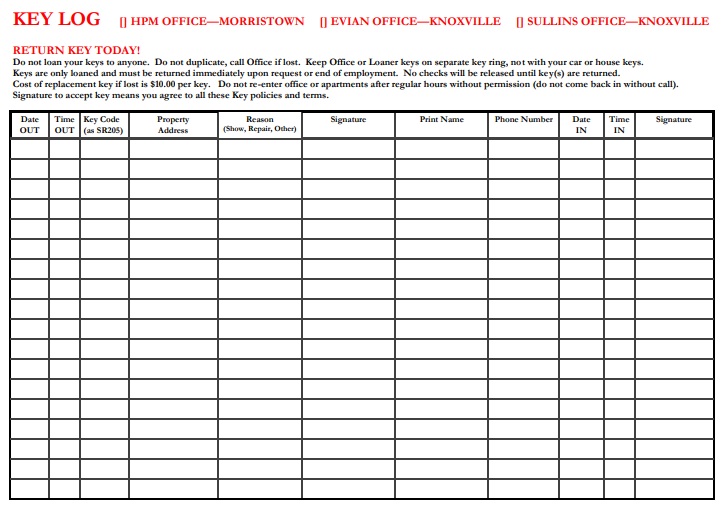
Key Tracking Log Template
Key Decision Log Template
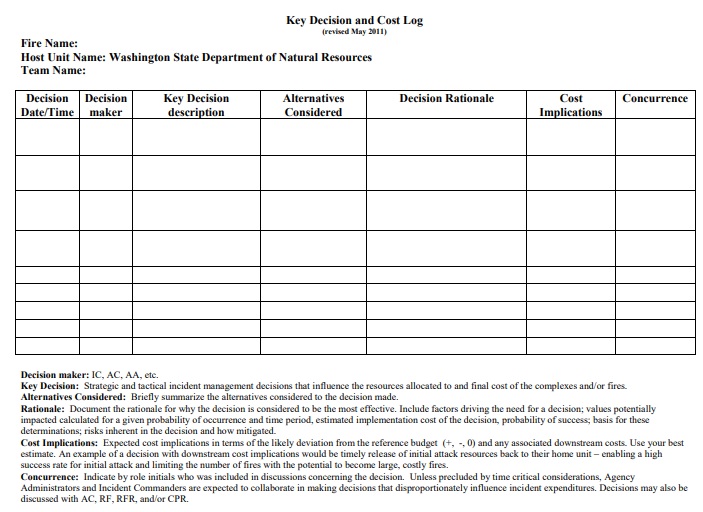
Key Control Register Log Template

Key Control Log Spreadsheet
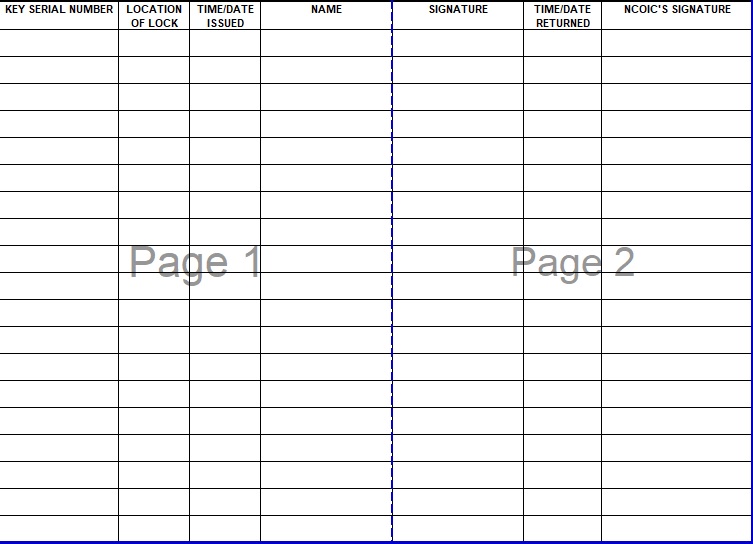
Free Key Inventory Log Sheet
What is the importance of the key log template?
Many people don’t have enough time to create a well-presented template. Therefore, they always find a simple and precise template for conveniently develop a key log. It saves your time because this template allows you to create any document within a fraction of seconds. However, people used it for locating keys. It also informs people about the usage of keys in a day. You may also see the Exercise Log Template .
In conclusion, a key log template is a professionally well-designed document that allows you to record and monitor keys being used during a certain time period.
You May also Like
Sharing is caring!
I am Ryan Duffy and legal writer. I received a bachelor of business administration (BBA) degree from London Business School. I have 8+ years of writing experience in the different template fields and working with ExcelTMP.com for 7 years. I work with a team of writers and business and legal professionals to provide you with the best templates.

Keyboard shortcuts in Word
Using an external keyboard with keyboard shortcuts in Word may help you work more efficiently. For people with mobility or vision disabilities, keyboard shortcuts can be easier than using a touchscreen, and are a helpful alternative to using a mouse.
The shortcuts in this topic refer to the US keyboard layout. Keys for other layouts might not fully correspond to the keys on a US keyboard.
A plus sign ( + ) in a shortcut means that you need to press multiple keys at the same time.
A comma ( , ) in a shortcut means that you need to press multiple keys in order.
This article describes the keyboard shortcuts and function keys in Word for Windows.
To quickly find a shortcut in this article, press Ctrl+F, and enter your search word.
If an action does not have a corresponding shortcut key, you can record a macro to create one. Learn how here: Create or run a macro or Use a screen reader to create a macro in Word .
Not all shortcut features listed for Word are supported in Word Starter version. Learn more here: Word features that are not fully supported in Word Starter .
As reference, you can use this document .
In this topic
Frequently used shortcuts, ribbon keyboard shortcuts, navigate the document, preview and print documents, select text and graphics, edit text and graphics, work with web content, work with tables, review a document, work with references, citations, and indexing, work with mail merge and fields, work with text in other languages, work with document views, use function key shortcuts.
This table shows the most frequently used shortcuts in Microsoft Word.
| To do this | Press |
|---|---|
| Open a document. | Ctrl+O |
| Create a new document. | Ctrl+N |
| Save the document. | Ctrl+S |
| Close the document. | Ctrl+W |
| Cut the selected content to the Clipboard. | Ctrl+X |
| Copy the selected content to the Clipboard. | Ctrl+C |
| Paste the contents of the Clipboard. | Ctrl+V |
| Select all document content. | Ctrl+A |
| Apply bold formatting to text. | Ctrl+B |
| Apply italic formatting to text. | Ctrl+I |
| Apply underline formatting to text. | Ctrl+U |
| Decrease the font size by 1 point. | Ctrl+Left bracket ([) |
| Increase the font size by 1 point. | Ctrl+Right bracket (]) |
| Center the text. | Ctrl+E |
| Align the text to the left. | Ctrl+L |
| Align the text to the right. | Ctrl+R |
| Cancel a command. | Esc |
| Undo the previous action. | Ctrl+Z |
| Redo the previous action, if possible. | Ctrl+Y |
| Adjust the zoom magnification. | Alt+W, Q, then use the Tab key in the dialog box to go to the value you want. |
| Split the document window. | Ctrl+Alt+S |
| Remove the document window split. | Alt+Shift+C or Ctrl+Alt+S |
Top of Page
Close a task pane
To close a task pane using the keyboard:
Press F6 until the task pane is selected.
Press Ctrl+Spacebar.
Use the arrow keys to select Close , and then press Enter.
The ribbon area groups together related options in tabs. For example, on the Home tab, the Font group includes the Font Color option. Press the Alt key to display the ribbon shortcuts -- called Key Tips -- as seen below.

Note: Add-ins and other programs can add new tabs to the ribbon and possibly provide access keys for those tabs.
For various ribbon options you can combine the Key Tips letters with the Alt key to make shortcuts called Access Keys. For example, press Alt+H to open the Home tab, and Alt+Q to move to the Tell Me or Search field. Press Alt again to see Key Tips for the options for the selected tab.
Depending on the version of Microsoft 365 you are using, the Search text field at the top of the app window might be called Tell Me instead. Both offer a largely similar experience, but some options and search results can vary.
In newer versions of Office, most of the old Alt key menu shortcuts still work, too. However, you need to know the full shortcut. For example, press Alt, and then press one of the old menu keys E (Edit), V (View), I (Insert), and so on. A notification pops up saying you're using an access key from an earlier version. If you know the entire key sequence, you can still use it. Otherwise, press Esc and use Key Tips instead.
Use the Access Keys for ribbon tabs
To go directly to a tab on the ribbon, press one of the following access keys. Additional tabs might appear depending on your selection in the document.
| To do this | Press |
|---|---|
| Move to the or field on the Ribbon to search for assistance or Help content. | Alt+Q, then enter the search term. |
| Open the page to use Backstage view. | Alt+F |
| Open the tab to use common formatting commands, paragraph styles, and the Find tool. | Alt+H |
| Open the tab to insert tables, pictures and shapes, headers, or text boxes. | Alt+N |
| Open the tab to use themes, colors, and effects, such as page borders. | Alt+G |
| Open the tab to work with page margins, page orientation, indentation, and spacing. | Alt+P |
| Open the tab to add a table of contents, footnotes, or a table of citations. | Alt+S |
| Open the tab to manage Mail Merge tasks and to work with envelopes and labels. | Alt+M |
| Open the tab to use Spell Check, set proofing languages, and to track and review changes to your document. | Alt+R |
| Open the tab to choose a document view or mode, such as Read Mode or Outline view. You can also set the zoom magnification and manage multiple document windows. | Alt+W |
Work in the ribbon with the keyboard
|
|
|
|---|---|
| Select the active tab on the ribbon and activate the access keys. | Alt or F10. To move to a different tab, use access keys or the arrow keys. |
| Move the focus to commands on the ribbon. | Tab key or Shift+Tab |
| Move between command groupings on the ribbon. | Ctrl+Left or Right arrow key |
| Move among the items on the ribbon. | Arrow keys |
| Show the tooltip for the ribbon element currently in focus. | Ctrl+Shift+F10 |
| Activate the selected button. | Spacebar or Enter |
| Open the list for the selected command. | Down arrow key |
| Open the menu for the selected button. | Alt+Down arrow key |
| When a menu or submenu is open, move to the next command. | Down arrow key |
| Expand or collapse the ribbon. | Ctrl+F1 |
| Open the context menu. | Shift+F10 Or, on a Windows keyboard, the Windows Menu key (between the right Alt and right Ctrl keys) |
| Move to the submenu when a main menu is open or selected. | Left arrow key |
| To do this | Press |
|---|---|
| Move the cursor one word to the left. | Ctrl+Left arrow key |
| Move the cursor one word to the right. | Ctrl+Right arrow key |
| Move the cursor up by one paragraph. | Ctrl+Up arrow key |
| Move the cursor down by one paragraph. | Ctrl+Down arrow key |
| Move the cursor to the end of the current line. | End |
| Move the cursor to the beginning the current line. | Home |
| Move the cursor to the top of the screen. | Ctrl+Alt+Page up |
| Move the cursor to the bottom of the screen. | Ctrl+Alt+Page down |
| Move the cursor by scrolling the document view up by one screen. | Page up |
| Move the cursor by scrolling the document view down by one screen. | Page down |
| Move the cursor to the top of the next page. | Ctrl+Page down |
| Move the cursor to the top of the previous page. | Ctrl+Page up |
| Move the cursor to the end of the document. | Ctrl+End |
| Move the cursor to the beginning of the document. | Ctrl+Home |
| Move the cursor to the location of the previous revision. | Shift+F5 |
| Move the cursor to the location of the last revision made before the document was last closed. | Shift+F5, immediately after opening the document. |
| Cycle through floating shapes, such as text boxes or images. | Ctrl+Alt+5, and then the Tab key repeatedly |
| Exit the floating shape navigation and return to the normal navigation. | Esc |
| Display the task pane, to search within the document content. | Ctrl+F |
| Display the dialog box, to navigate to a specific page, bookmark, footnote, table, comment, graphic, or other location. | Ctrl+G |
| Cycle through the locations of the four previous changes made to the document. | Ctrl+Alt+Z |
| To do this | Press |
|---|---|
| Print the document. | Ctrl+P |
| Switch to print preview. | Ctrl+Alt+I |
| Move around the preview page when zoomed in. | Arrow keys |
| Move by one preview page when zoomed out. | Page up or Page down |
| Move to the first preview page when zoomed out. | Ctrl+Home |
| Move to the last preview page when zoomed out. | Ctrl+End |
| To do this | Press |
|---|---|
| Select text. | Shift+Arrow keys |
| Select the word to the left. | Ctrl+Shift+Left arrow key |
| Select the word to the right. | Ctrl+Shift+Right arrow key |
| Select from the current position to the beginning of the current line. | Shift+Home |
| Select from the current position to the end of the current line. | Shift+End |
| Select from the current position to the beginning of the current paragraph. | Ctrl+Shift+Up arrow key |
| Select from the current position to the end of the current paragraph. | Ctrl+Shift+Down arrow key |
| Select from the current position to the top of the screen. | Shift+Page up |
| Select from the current position to the bottom of the screen. | Shift+Page down |
| Select from the current position to the beginning of the document. | Ctrl+Shift+Home |
| Select from the current position to the end of the document. | Ctrl+Shift+End |
| Select from the current position to the bottom of the window. | Ctrl+Alt+Shift+Page down |
| Select all document content. | Ctrl+A |
Extend a selection
| To do this | Press |
|---|---|
| Start extending the selection. | F8 In the extend selection mode, clicking a location in the document extends the current selection to that location. |
| Select the nearest character to the left or right. | F8, Left or Right arrow key |
| Expand the selection. | F8 repeatedly to expand the selection to the entire word, sentence, paragraph, section, and document. |
| Reduce the selection. | Shift+F8 |
| Select a vertical block of text. | Ctrl+Shift+F8, then press the arrow keys |
| Stop extending the selection. | Esc |
| To do this | Press |
|---|---|
| Delete one word to the left. | Ctrl+Backspace |
| Delete one word to the right. | Ctrl+Delete |
| Open the task pane and enable the Office Clipboard, which allows you to copy and paste content between Microsoft 365 apps. | Alt+H, F, O |
| Cut the selected content to the Clipboard. | Ctrl+X |
| Copy the selected content to the Clipboard. | Ctrl+C |
| Paste the contents of the Clipboard. | Ctrl+V |
| Move the selected content to a specific location. | F2, move the cursor to the destination, and then press Enter. |
| Copy the selected content to a specific location. | Shift+F2, move the cursor to the destination, and then press Enter. |
| Define an AutoText block with the selected content. | Alt+F3 |
| Insert an AutoText block. | The first few characters of the AutoText block, and then press Enter when the ScreenTip appears. |
| Cut the selected content to the Spike. | Ctrl+F3 |
| Paste the contents of the Spike. | Ctrl+Shift+F3 |
| Copy the selected formatting. | Ctrl+Shift+C |
| Paste the selected formatting. | Ctrl+Shift+V |
| Copy the header or footer used in the previous section of the document. | Alt+Shift+R |
| Display the dialog box, to find and replace text, specific formatting, or special items. | Ctrl+H |
| Display the dialog box, to insert a file object into the document. | Alt+N, J, J |
| Insert a SmartArt graphic. | Alt+N, M |
| Insert a WordArt graphic. | Alt+N, W |
Align and format paragraphs
| To do this | Press |
|---|---|
| Center the paragraph. | Ctrl+E |
| Justify the paragraph. | Ctrl+J |
| Align the paragraph to the left. | Ctrl+L |
| Align the paragraph to the right. | Ctrl+R |
| Indent the paragraph. | Ctrl+M |
| Remove a paragraph indent. | Ctrl+Shift+M |
| Create a hanging indent. | Ctrl+T |
| Remove a hanging indent. | Ctrl+Shift+T |
| Remove paragraph formatting. | Ctrl+Q |
| Apply single spacing to the paragraph. | Ctrl+1 |
| Apply double spacing to the paragraph. | Ctrl+2 |
| Apply 1.5-line spacing to the paragraph. | Ctrl+5 |
| Add or remove space before the paragraph. | Ctrl+0 (zero) |
| Enable AutoFormat. | Ctrl+Alt+K |
| Apply the style. | Ctrl+Shift+N |
| Apply the style. | Ctrl+Alt+1 |
| Apply the style. | Ctrl+Alt+2 |
| Apply the style. | Ctrl+Alt+3 |
| Display the task pane. | Ctrl+Shift+S |
| Display the task pane. | Ctrl+Alt+Shift+S |
Format characters
| To do this | Press |
|---|---|
| Display the dialog box. | Ctrl+D or Ctrl+Shift+F |
| Increase the font size. | Ctrl+Shift+Right angle bracket (>) |
| Decrease the font size. | Ctrl+Shift+Left angle bracket (<) |
| Increase the font size by 1 point. | Ctrl+Right bracket (]) |
| Decrease the font size by 1 point. | Ctrl+Left bracket ([) |
| Switch the text between upper case, lower case, and title case. | Shift+F3 |
| Change the text to all upper case. | Ctrl+Shift+A |
| Hide the selected text. | Ctrl+Shift+H |
| Apply bold formatting. | Ctrl+B |
| Add a bulleted list. | Ctrl+Shift+L |
| Apply underline formatting. | Ctrl+U |
| Apply underline formatting to the words, but not the spaces. | Ctrl+Shift+W |
| Apply double-underline formatting. | Ctrl+Shift+D |
| Apply italic formatting. | Ctrl+I |
| Apply small caps formatting. | Ctrl+Shift+K |
| Apply subscript formatting. | Ctrl+Equal sign ( = ) |
| Apply superscript formatting. | Ctrl+Shift+Plus sign (+) |
| Remove manual character formatting. | Ctrl+Spacebar |
| Change the selected text to the Symbol font. | Ctrl+Shift+Q |
Manage text formatting
| To do this | Press |
|---|---|
| Display all nonprinting characters. | Ctrl+Shift+8 (do not use the numeric keypad) |
| Display the task pane. | Shift+F1 |
Insert special characters
| To do this | Press |
|---|---|
| Insert a line break. | Shift+Enter |
| Insert a page break. | Ctrl+Enter |
| Insert a column break. | Ctrl+Shift+Enter |
| Insert an em dash (—). | Ctrl+Alt+Minus sign (on the numeric keypad) |
| Insert an en dash (–). | Ctrl+Minus sign (on the numeric keypad) |
| Insert an optional hyphen. | Ctrl+Hyphen (-) |
| Insert a nonbreaking hyphen. | Ctrl+Shift+Hyphen (-) |
| Insert a nonbreaking space. | Ctrl+Shift+Spacebar |
| Insert a copyright symbol (©). | Ctrl+Alt+C |
| Insert a registered trademark symbol (®). | Ctrl+Alt+R |
| Insert a trademark symbol (™). | Ctrl+Alt+T |
| Insert an ellipsis (…) | Ctrl+Alt+Period (.) |
| Insert the Unicode character for the specified Unicode (hexadecimal) character code. For example, to insert the euro currency symbol ( ), type 20AC, and then hold down Alt and press X. To find out the Unicode character code for a selected character, press Alt+X. | The character code, then press Alt+X |
| Insert the ANSI character for the specified ANSI (decimal) character code. For example, to insert the euro currency symbol, hold down Alt and press 0128 on the numeric keypad. | Alt+the character code (on the numeric keypad) |
| To do this | Press |
|---|---|
| Insert a hyperlink. | Ctrl+K |
| Go back one page. | Alt+Left arrow key |
| Go forward one page. | Alt+Right arrow key |
| Refresh the page. | F9 |
Move around in a table
| To do this | Press |
|---|---|
| Move to the next cell in the row and select its content. | Tab key |
| Move to the previous cell in the row and select its content. | Shift+Tab |
| Move to the first cell in the row. | Alt+Home |
| Move to the last cell in the row. | Alt+End |
| Move to the first cell in the column. | Alt+Page up |
| Move to the last cell in the column. | Alt+Page down |
| Move to the previous row. | Up arrow key |
| Move to the next row. | Down arrow key |
| Move one row up. | Alt+Shift+Up arrow key |
| Move one row down. | Alt+Shift+Down arrow key |
Select table content
| To do this | Press |
|---|---|
| Select the content in the next cell. | Tab key |
| Select the content in the previous cell. | Shift+Tab |
| Extend a selection to adjacent cells. | Shift+Arrow keys |
| Select a column. | Select the top or bottom cell of the column, and then press Shift+Up or Down arrow key |
| Select a row. | Select the first or last cell in the row, and then press Shift+Alt+End or Home. |
| Select the whole table. | Alt+5 on the numeric keypad, with Num Lock switched off |
Insert paragraphs and tab characters in a table
| To do this | Press |
|---|---|
| Insert a new paragraph in a cell. | Enter |
| Insert a tab character in a cell. | Ctrl+Tab |
| To do this | Press |
|---|---|
| Insert a comment. | Ctrl+Alt+M |
| Turn change tracking on or off. | Ctrl+Shift+E |
| Close the . | Alt+Shift+C |
Use the following shortcuts to add references to your document, such as a table of contents, footnotes, and citations.
| To do this | Press |
|---|---|
| Mark a table of contents entry. | Alt+Shift+O |
| Mark a table of authorities entry (citation). | Alt+Shift+I |
| Choose citation options. | Alt+Shift+F12, Spacebar |
| Mark an index entry. | Alt+Shift+X |
| Insert a footnote. | Ctrl+Alt+F |
| Insert an endnote. | Ctrl+Alt+D |
| Go to the next footnote. | Alt+Shift+Right angle bracket (>) |
| Go to the previous footnote. | Alt+Shift+Left angle bracket (<) |
To use the following keyboard shortcuts, the Mailings ribbon tab must be selected. To select the Mailings tab, press Alt+M.
Perform a mail merge
| To do this | Press |
|---|---|
| Preview the mail merge. | Alt+Shift+K |
| Merge a document. | Alt+Shift+N |
| Print the merged document. | Alt+Shift+M |
| Edit a mail-merge data document. | Alt+Shift+E |
| Insert a merge field. | Alt+Shift+F |
Work with fields
| To do this | Press |
|---|---|
| Insert a DATE field. | Alt+Shift+D |
| Insert a LISTNUM field. | Ctrl+Alt+L |
| Insert a PAGE field. | Alt+Shift+P |
| Insert a TIME field. | Alt+Shift+T |
| Insert an empty field. | Ctrl+F9 |
| Update the linked information in a Word source document. | Ctrl+Shift+F7 |
| Update the selected fields. | F9 |
| Unlink a field. | Ctrl+Shift+F9 |
| Switch between a selected field code and its result. | Shift+F9 |
| Switch between all field codes and their results. | Alt+F9 |
| Run GOTOBUTTON or MACROBUTTON from a field displaying field results. | Alt+Shift+F9 |
| Go to the next field. | F11 |
| Go to the previous field. | Shift+F11 |
| Lock a field. | Ctrl+F11 |
| Unlock a field. | Ctrl+Shift+F11 |
Set the proofing language
Every document has a default language, typically the same default language as your computer's operating system. If your document also contains words or phrases in a different language, it's a good idea to set the proofing language for those words. This not only makes it possible to check spelling and grammar for those phrases, but it also enables assistive technologies like screen readers to handle them appropriately.
| To do this | Press |
|---|---|
| Display the dialog box to set the proofing language. | Alt+R, U, L |
| Set default languages. | Alt+R, L |
Insert international characters
To type a lowercase character by using a key combination that includes the Shift key, hold down the Ctrl+Shift+symbol keys simultaneously, and then release them before you type the letter.
Note: If you type extensively in another language, you might prefer to switch to a different keyboard instead.
| To insert this |
|
|---|---|
| à, è, ì, ò, ù, À, È, Ì, Ò, Ù | Ctrl+Grave accent (`), the letter |
| á, é, í, ó, ú, ý Á, É, Í, Ó, Ú, Ý | Ctrl+Single quotation mark ('), the letter |
| â, ê, î, ô, û Â, Ê, Î, Ô, Û | Ctrl+Shift+Caret (^), the letter |
| ã, ñ, õ Ã, Ñ, Õ | Ctrl+Shift+Tilde (~), the letter |
| ä, ë, ï, ö, ü, ÿ, Ä, Ë, Ï, Ö, Ü, Ÿ | Ctrl+Shift+Colon (:), the letter |
| å, Å | Ctrl+Shift+At sign (@), a or A |
| æ, Æ | Ctrl+Shift+Ampersand (&), a or A |
| œ, Œ | Ctrl+Shift+Ampersand (&), o or O |
| ç, Ç | Ctrl+Comma (,), c or C |
| ð, Ð | Ctrl+Single quotation mark ('), d or D |
| ø, Ø | Ctrl+Forward slash (/), o or O |
| ¿ | Ctrl+Alt+Shift+Question mark (?) |
| ¡ | Ctrl+Alt+Shift+Exclamation point (!) |
| ß | Ctrl+Shift+Ampersand (&), s |
Use Input Method Editors for East Asian languages
| To do this | Press |
|---|---|
| Switch to the Japanese Input Method Editor (IME) for a 101-key keyboard, if available. | Alt+Tilde (~) |
| Switch to the Korean Input Method Editor (IME) for a 101-key keyboard, if available. | Right Alt |
| Switch to the Chinese Input Method Editor (IME) for a 101-key keyboard, if available. | Ctrl+Spacebar |
Word offers several different views of a document. Each view makes it easier to do certain tasks. For example, Read Mode enables you view the document as a horizontal sequence of pages, which you can quickly browse using the Left and Right arrow keys.
Switch the document view
| To do this | Press |
|---|---|
| Switch to the view. | Alt+W, F |
| Switch to the view. | Ctrl+Alt+P |
| Switch to the view. | Ctrl+Alt+O |
| Switch to the view. | Ctrl+Alt+N |
Outline a document
These shortcuts only apply when the document is in the Outline view.
| To do this | Press |
|---|---|
| Promote a paragraph. | Alt+Shift+Left arrow key |
| Demote a paragraph. | Alt+Shift+Right arrow key |
| Demote the paragraph to body text. | Ctrl+Shift+N |
| Move the selected paragraphs up. | Alt+Shift+Up arrow key |
| Move the selected paragraphs down. | Alt+Shift+Down arrow key |
| Expand the text under a heading. | Alt+Shift+Plus sign (+) |
| Collapse the text under a heading. | Alt+Shift+Minus sign (-) |
| Expand or collapse all text or headings. | Alt+Shift+A |
| Hide or display the character formatting. | Forward slash (/) (on the numeric keypad) |
| Switch between showing the first line of body text and showing all body text. | Alt+Shift+L |
| Show all headings with the style. | Alt+Shift+1 |
| Show all headings with the specified heading level. | Alt+Shift+Heading level number |
| Insert a tab character. | Ctrl+Tab |
Move through the document in Read Mode
| To do this | Press |
|---|---|
| Move to the beginning of the document. | Home |
| Move to the end of the document. | End |
| Go to a specific page. | Type the page number, then press Enter |
| Exit Read Mode. | Esc |
| Key | Description |
|---|---|
| F1 | task pane. task pane. |
| F2 | tab in the Backstage view. dialog box. |
| F3 | |
| F4 | or action. |
| F5 | dialog box. dialog box. |
| F6 | |
| F7 | task pane to check spelling and grammar in the document or the selected text. task pane. task pane. |
| F8 | dialog box to create, run, edit, or delete a macro. |
| F9 | |
| F10 | task pane. change. |
| F11 | editor, in which you can create a macro using Visual Basic for Applications (VBA). |
| F12 | dialog box. dialog box. tab in the Backstage view. button in the Table of Contents container when the container is active. |
Word help center
Basic tasks using a screen reader with Word
Use a screen reader to explore and navigate Word
Screen reader support for Word
This article describes the keyboard shortcuts and function keys in Word for Mac.
The settings in some versions of the Mac operating system (OS) and some utility applications might conflict with keyboard shortcuts and function key operations in Microsoft 365 for Mac. For information about changing the key assignment for a keyboard shortcut, see Mac Help for your version of macOS, your utility application, or refer to Shortcut conflicts .
If you don't find a keyboard shortcut here that meets your needs, you can create a custom keyboard shortcut. For instructions, go to Create a custom keyboard shortcut for Office for Mac .
Many of the shortcuts that use the Ctrl key on a Windows keyboard also work with the Control key in Word for Mac. However, not all do.
To quickly find a shortcut in this article, you can use Search. Press Command+F, and then type your search words.
For the best experience using your keyboard with the ribbon, enable your keyboard to access all controls.
To go to Keyboard Settings , type keyboard and press Return.
In the Shortcuts tab, press Control+F7 to change the Full Keyboard Access setting from Text boxes and lists only to All Controls .
Shortcut conflicts
Use footnotes and endnotes, work with right-to-left languages.
This table lists frequently used shortcuts in Word for Mac.
| To do this | Press |
|---|---|
| Undo the previous action. |
+Z or F1 |
| Redo the previous action, if possible. |
+Y |
| Cut the selected content to the Clipboard. |
+X or F2 |
| Copy the selected content to the Clipboard. |
+C or F3 |
| Paste the contents of the Clipboard. |
+V or F4 |
| Display the shortcut menu for the selected item. * | Shift+F10 |
| Display the dialog box. |
+Option+G or F5 |
| Display the dialog box. |
+Option+L or F7 |
| Enable extended selection mode. | F8 |
| Switch to the next window. |
+Grave accent ( ` ) |
| Switch to the previous window. |
+Shift+Grave accent (`) |
| Display the dialog box. |
+Shift+S |
| Find text (move focus to the box). |
+F |
| Display the pane. | Control+H |
| Display the dialog box. |
+P |
| Close the current document. |
+F4 |
| Expand or minimize the ribbon. |
+Option+R |
| Find the next spelling or grammatical error. The feature must be enabled. | Option+F7 |
| Open the Dictionary. | Option+Shift+F7 |
Some Word for Mac keyboard shortcuts conflict with default macOS keyboard shortcuts. This topic flags such shortcuts with an asterisk ( * ). To use these shortcuts, you may have to change your Mac keyboard settings to change the shortcut for the key.
Change system preferences for keyboard shortcuts
From the Apple menu, select System Preferences .
Select Keyboard .
Select the Shortcuts tab.
Select Mission Control .
Clear the check box for the keyboard shortcut conflicting with the Word for Mac shortcut that you want to use.
| To do this | Press |
|---|---|
| Move the cursor one word to the left. | Option+Left arrow key |
| Move the cursor one word to the right. | Option+Right arrow key |
| Move the cursor up by one paragraph. |
+Up arrow key |
| Move the cursor down by one paragraph. |
+Down arrow key |
| Move the cursor to the beginning of the current line. |
+Left arrow Home |
| Move the cursor to the end of the current line. |
+Right arrow key End |
| Move the cursor to the top of the previous page. |
+Page up On a MacBook, press +Fn+Up arrow key |
| Move the cursor to the top of the next page. |
+Page down On a MacBook, press +Fn+Down arrow key |
| Move the cursor to the beginning of the document. |
+Home On a MacBook, press +Fn+Left arrow key |
| Move the cursor to the end of the document. |
+End On a MacBook, press +Fn+Right arrow key |
| Move the cursor to the previous insertion point. | Shift+F5 |
| Move the cursor by scrolling the document view up by one screen. | Page up |
| Move the cursor by scrolling the document view down by one screen. | Page down |
| To do this | Press |
|---|---|
| Select multiple items that are not next to each other. | Select the first item that you want, hold down , and then mouse click the additional items. |
| Select text. | Shift+Arrow keys |
| Select the word to the left. | Shift+Option+Left arrow key |
| Select the word to the right. | Shift+Option+Right arrow key |
| Select from the current position to the beginning of the current line. |
+Shift+Left arrow key Shift+Home |
| Select from the current position to the end of the current line. |
+Shift+Right arrow key Shift+End |
| Select from the current position to the beginning of the current paragraph. |
+Shift+Up arrow key |
| Select from the current position to the end of the current paragraph. |
+Shift+Down arrow key |
| Select from the current position to the top of the screen. | Shift+Page up |
| Select from the current position to the bottom of the screen. | Shift+Page down |
| Select from the current position to the beginning of the document. |
+Shift+Home |
| Select from the current position to the end of the document. |
+Shift+End |
| Select from the current position to the bottom of the window. |
+Shift+Option+Page down |
| Select all document content. |
+A |
| To do this | Press |
|---|---|
| Start extending the selection. * | F8 In the extend selection mode, clicking a location in the document extends the current selection to that location. |
| Select the nearest character to the left. | F8, Left arrow key |
| Select the nearest character to the right. | F8, Right arrow key |
| Expand the selection. | F8 repeatedly to expand the selection to the entire word, sentence, paragraph, section, and document. |
| Reduce the selection. * | Shift+F8 |
| Select a vertical block of text. |
+Shift+F8, then press the arrow keys |
| Stop extending the selection. | Esc |
| To do this | Press |
|---|---|
| Cut the selected content to the Clipboard. |
+X F2 |
| Copy the selected content to the Clipboard. |
+C F3 |
| Paste the contents of the Clipboard. |
+V F4 |
| Display the dialog box. |
+Control+V |
| Cut the selected content to the Spike. |
+F3 |
| Paste the contents of the Spike. |
+Shift+F3 |
| Copy the selected formatting. |
+Shift+C |
| Paste the copied formatting. |
+Shift+V |
| Create an AutoText entry. | Option+F3 |
| To do this | Press |
|---|---|
| Center the paragraph. |
+E |
| Justify the paragraph. |
+J |
| Align the paragraph to the left. |
+L |
| Align the paragraph to the right. |
+R |
| Indent the paragraph. | Control+Shift+M |
| Remove a paragraph indent. |
+Shift+M |
| Create a hanging indent. |
+T |
| Remove a hanging indent. |
+Shift+T |
| Apply single-spacing to the paragraph. |
+1 |
| Apply double-spacing to the paragraph. |
+2 |
| Apply 1.5-line spacing to the paragraph. |
+5 |
| Enable AutoFormat. |
+Option+K |
| Apply the style. |
+Shift+N |
| Apply the style. |
+Option+1 |
| Apply the style. |
+Option+2 |
| Apply the style. |
+Option+3 |
| Apply the style. |
+Shift+L, when the cursor is at the beginning of a line |
| Insert a nonbreaking space. | Option+Spacebar |
| To do this | Press |
|---|---|
| Increase the font size. |
+Shift+Right angle bracket (>) |
| Decrease the font size. |
+Shift+Left angle bracket (<) |
| Increase the font size by 1 point. |
+Right bracket (]) |
| Decrease the font size by 1 point. |
+Left bracket ([) |
| Display the dialog box. |
+D |
| Switch the text between upper case, lower case, and title case. | Shift+F3 |
| Change the text to all upper case. |
+Shift+A |
| Apply bold formatting. |
+B |
| Add a bulleted list. |
+Shift+L |
| Apply underline formatting. |
+U |
| Apply underline formatting to the words, but not the spaces. |
+Shift+W |
| Apply double-underline formatting. |
+Shift+D |
| Apply italics formatting. |
+I |
| Apply small caps formatting. |
+Shift+K |
| Apply strike-through formatting. |
+Shift+X |
| To do this | Press |
|---|---|
| Insert an empty field. |
+F9 |
| Insert a line break. | Shift+Return |
| Insert a page break. |
+Return |
| Insert a column break. |
+Shift+Return |
| Insert a nonbreaking hyphen. |
+Shift+Hyphen (-) |
| Insert a registered trademark symbol (®). | Option+R |
| Insert a trademark symbol (™). | Option+2 |
| To do this | Press |
|---|---|
| Move to the next cell and select its content. | Tab key |
| Move to the previous cell and select its content. | Shift+Tab |
| Move to the next row. | Down arrow key |
| Move to the previous row. | Up arrow key |
| Move to the first cell in the row. | Control+Home |
| Move to the last cell in the row. | Control+End |
| Move to the first cell in the column. | Control+Page up |
| Move to the last cell in the column. | Control+Page down |
| Add a new row to the bottom of the table. | Tab key, at the end of the last row |
| Insert a row. |
+Control+I |
| To do this | Press |
|---|---|
| Select the content in the next cell. | Tab key |
| Select the content in the previous cell. | Shift+Tab |
| Extend a selection to adjacent cells. | Shift+Arrow keys |
| Select a row. | Select the first or last cell in the row, and then press Shift+Alt+End or Home. |
Resize table columns with the ruler
| To do this | Press |
|---|---|
| Retain the column sizes to the right and change the table width. | Drag the column boundary in the ruler |
| Move a single column line and retain the table width. | Shift+Drag the column boundary in the ruler |
| Equally resize all columns to the right and retain the table width. |
+Shift+Drag the column boundary in the ruler |
| Proportionally resize all columns to the right and retain the table width. |
+Drag the column boundary in the ruler |
Resize table columns directly in a table
Tip: To finely adjust the column width and display the column's measurements in the ruler when you resize the column, turn off the snap-to functionality by pressing Option with the shortcut keys.
| To do this | Press |
|---|---|
| Move a single column line and retain the table width. | Drag the column boundary |
| Retain column sizes to the right and change the table width. | Shift+Drag the column boundary |
| Equally resize all columns to the right and retain the table width. |
+Shift+Drag the column boundary |
| Proportionally resize all columns to the right and retain the table width. |
+Drag the column boundary |
| To do this | Press |
|---|---|
| Insert a new paragraph in a cell. | Return |
| Insert a Tab character in a cell. | Option+Tab |
| To do this | Press |
|---|---|
| Toggle drawing mode. |
+Control+Z |
| To do this | Press |
|---|---|
| Insert a DATE field. | Control+Shift+D |
| Insert a LISTNUM field. |
+Option+Shift+L |
| Insert a PAGE field. | Control+Shift+P |
| Insert a TIME field. | Control+Shift+T |
| Insert an empty field. |
+F9 |
| Update the selected fields. * | F9 |
| Switch between a field code and its result. * | Shift+F9 |
| Switch between all field codes and their results. | Option+F9 |
| Run GOTOBUTTON or MACROBUTTON from a field displaying field results. | Option+Shift+F9 |
| Lock a field. |
+F11 |
| Unlock a field. |
+Shift+F11 |
| To do this | Press |
|---|---|
| Promote a paragraph. | Control+Shift+Left arrow key |
| Demote a paragraph. | Control+Shift+Right arrow key |
| Demote the paragraph to body text. |
+Shift+N |
| Move the selected paragraphs up. * | Control+Shift+Up arrow key |
| Move the selected paragraphs down. * | Control+Shift+Down arrow key |
| Expand the text under a heading. | Control+Shift+Plus sign (+) |
| Collapse text under a heading. * | Control+Shift+Minus sign (-) |
| Expand all body text and headings, or collapse all body text. | Control+Shift+A |
| Switch between showing the first line of body text and showing all body text. | Control+Shift+L |
| Show all headings with the specified heading level. | Control+Shift+Heading level number |
| To do this | Press |
|---|---|
| Insert a comment. |
+Option+A |
| Turn change tracking on or off. |
+Shift+E |
| Move to the beginning of a comment. | Home |
| Move to the end of a comment. | End (The End key is not available on all keyboards.) |
| Move to the beginning of the list of comments. |
+Home, in the . |
| Move to the end of the list of comments. |
+End, in the . |
| To do this | Press |
|---|---|
| Insert a footnote. |
+Option+F |
| Insert an endnote. |
+Option+E |
Word supports right-to-left functionality for languages that work in a right-to-left or a combined right-to-left, left-to-right environment for writing, editing, and displaying text. In this context, right-to-left languages refers to any writing system that is written from right to left and includes languages that require contextual shaping, such as Arabic, and languages that do not.
Before you can use these keyboard shortcuts, you need to ensure keyboard shortcuts are enabled for the language you are using:
Go to Apple > System Preferences > Keyboard .
On the Input Sources tab, select the language for which you want to enable shortcuts.
On the right side of the tab, select the check box for Enable keyboard shortcuts .
| To do this | Press |
|---|---|
| Switch the writing direction to right-to-left. | Control+ + Left arrow key |
| Switch the writing direction to left-to-right. | Control+ + Right arrow key |
Word for Mac uses the function keys for common commands, including Copy and Paste. For quick access to these shortcuts, you can change your Apple system preferences so you don't have to press the Fn key every time you use a function key shortcut.
Note: Changing system function key preferences affects how the function keys work on your Mac, not just in Word. After changing this setting, you can still perform the special features printed on a function key. Just press the Fn key. For example, to use the F12 key to change your volume, press Fn+F12.
If a function key doesn't work as you expect it to, press the Fn key in addition to the function key. If you don't want to press the Fn key each time, you can change your Apple system preferences. For instructions, go to Change function key preferences .
The following table provides the function key shortcuts for Word for Mac.
| Key | Description |
|---|---|
| F1 | |
| F2 | |
| F3 | +F3: cuts the selected content to the Spike. You can cut multiple texts and graphics to the Spike, and paste them as a group to another location. +Shift+F3: pastes the contents of the Spike. |
| F4 | or action. Shift+F4: repeats the last or action. |
| F5 | dialog box. +Shift+F5: displays the dialog. |
| F6 | +F6: switches to the next document window when more than one document is open. +Shift+F6: switches to the previous document window when more than one document is open. |
| F7 | dialog box. task pane. +Shift+F7: updates the linked information in a Word source document. . |
| F8 | +Shift+F8: turns extend selection mode on and off. In the extend selection mode, the arrow keys extend the selection. dialog box to create, run, edit, or delete a macro. |
| F9 | +F9: inserts an empty field. +Shift+F9: unlinks the current field. |
| F10 | |
| F11 | +F11: locks the current field. +Shift+F11: unlocks the current field. editor, in which you can create a macro using Visual Basic for Applications (VBA). |
Change function key preferences
In the Apple menu, select System Preferences .
On the Keyboard tab, select the check box for Use all F1, F2, etc. keys as standard function keys .
This article describes the keyboard shortcuts in Word for iOS.
If you're familiar with keyboard shortcuts on your macOS computer, the same key combinations work with Word for iOS using an external keyboard, too.
Edit and format the document
Frequently used shortcuts.
| To do this | Press |
|---|---|
| Save the document. |
+S |
| Print the document. |
+P |
| Close the document. |
+W |
| To do this | Press |
|---|---|
| Find text. |
+F |
| Find the next occurrence of text. |
+G |
| Find the previous occurrence of text. | Shift+ +G |
| Select all document content. |
+A |
| To do this | Press |
|---|---|
| To accept a text prediction. | Right arrow key |
| Undo the previous action. |
+Z |
| Redo the previous action, if possible. |
+Y |
| Cut the selected content to the clipboard. |
+X |
| Copy the selected content to the clipboard. |
+C |
| Paste the content from the clipboard. |
+V |
| Apply bold formatting to the selected text. |
+B |
| Apply Italic formatting to the selected text. |
+I |
| Underline the selected text. |
+U |
| Underline the selected words, but not the spaces. |
+Shift+W |
| Change the selected text to use the Normal style. | Alt+ +N |
| Change the selected text into a hyperlink. |
+K |
| Change the selected text to small caps. | Shift+ +K |
| Change the selected text to all caps. | Shift+ +A |
| Center the selected paragraph. |
+E |
| Justify the selected paragraph. |
+J |
| Align the selected paragraph to the left. |
+L |
| Align the selected paragraph to the right. |
+R |
| Indent the selected paragraph. | Control+Shift+M |
| Remove indent from the selected paragraph. | Shift+ +M |
| Apply hanging indent to the selected paragraph. |
+T |
| Apply the formatting of previously copied text to the currently selected text. | Shift+ +V |
| Add a comment to the selected text or shape. | Alt+ +A |
| Find and replace text. | Control+H |
| Toggle revision marks on or off in the document. | Shift+ +E |
Word help & learning
This article describes the keyboard shortcuts in Word for Android.
Note: To quickly find a shortcut in this article, you can use Search. Press Ctrl+F, and then type your search words.
| To do this | Press |
|---|---|
| Find text. | Ctrl+F |
| Move the cursor up by one paragraph. | Alt+Up arrow key |
| Move the cursor down by one paragraph. | Alt+Down arrow key |
| Move the cursor left by one word. | Alt+Left arrow key |
| Move the cursor right by one word. | Alt+Right arrow key |
| Move the cursor to the beginning of the current line. | Ctrl+Left arrow key |
| Move the cursor to the end of the current line. | Ctrl+Right arrow key |
| Select text. | Shift+Arrow keys |
| Select the paragraph above. | Shift+Alt+Up arrow key |
| Select the paragraph below. | Shift+Alt+Down arrow key |
| Select the word to the left. | Shift+Alt+Left arrow key |
| Select the word to the right. | Shift+Alt+Right arrow key |
| Select from the current position to the beginning of the line. | Shift+Ctrl+Left arrow key |
| Select from the current position to the end of the line. | Shift+Ctrl+Right arrow key |
| Select all document content. | Ctrl+A |
| To do this | Press |
|---|---|
| Undo the previous action. | Ctrl+Z |
| Redo the previous action, if possible. | Ctrl+Y |
| Cut the selected content to the clipboard. | Ctrl+X |
| Copy the selected content to the clipboard. | Ctrl+C |
| Paste the content from the clipboard. | Ctrl+V |
| Apply bold formatting to the selected text. | Ctrl+B |
| Apply italic formatting to the selected text. | Ctrl+I |
| Underline the selected text. | Ctrl+U |
| Insert a line break. | Shift+Enter |
Word help & learning
This article describes the keyboard shortcuts in Word for the web.
If you use Narrator with the Windows 10 Fall Creators Update, you have to turn off scan mode in order to edit documents, spreadsheets, or presentations with Microsoft 365 for the web. For more information, refer to Turn off virtual or browse mode in screen readers in Windows 10 Fall Creators Update .
To quickly find a shortcut in this article, you can use Search. Press Ctrl+F and then type your search words.
When you use Word for the web, we recommend that you use Microsoft Edge as your web browser. Because Word for the web runs in your web browser, the keyboard shortcuts are different from those in the desktop program. For example, you’ll use Ctrl+F6 instead of F6 for jumping in and out of the commands. Also, common shortcuts like F1 (Help) and Ctrl+O (Open) apply to the web browser – not Word for the web.

Work with comments
This table lists the most frequently used shortcuts in Word for the web.
Tip: To quickly create a new document in Word for the web, open your browser, type Word.new in the address bar, and then press Enter.
| To do this | Press |
|---|---|
| In the Reading view, open a PDF-based view tagged to work with screen readers. | Press the Tab key until you reach the button, and then press Enter |
| Find text in the Reading view. | Ctrl+F or F3 |
| Find text in the Editing view. | Ctrl+F or Ctrl+G |
| Find and replace text in the Editing view. | Ctrl+H |
| Hide the task pane, if one is open. | Esc |
| Switch to the control. | Alt+Period, W, then Q or Alt+Windows logo key, W, then Q |
| Print the document. | Ctrl+P |
| Move to the next landmark region. | Ctrl+F6 |
| Go to the or text field. | Alt+Q |
Word for the web offers shortcuts called access keys to navigate the ribbon. If you’ve used access keys to save time on Word for desktop computers, you’ll find access keys very similar in Word for the web.
On a Windows computer, access keys all start with Alt+Period (.) or Alt+Windows logo key, then add a letter for the ribbon tab. For example, to go to the Review tab, press Alt+Period, R or Alt+Windows logo key, R.
If you're using Word for the web on a Mac computer, press Control+Period (.) to start.

To get to the ribbon, press Alt+Period or Alt+Windows logo key. You can alternatively press Ctrl+F6 until you reach the Home tab.
To move between tabs on the ribbon, press the Tab key.
To hide the ribbon so you have more room to work, press Ctrl+F3. Repeat to display the ribbon again.
Go to the access keys for the ribbon
To go directly to a tab on the ribbon, press one of the following access keys:
| To do this | Press |
|---|---|
| Open the or text field on the ribbon to type a search term. | Alt+Period, Q or Alt+Windows logo key, Q |
| Open the tab to use the Backstage view. | Alt+Period, F or Alt+Windows logo key, F |
| Open the tab to format text and use the tool. | Alt+Period, H or Alt+Windows logo key, H |
| Open the tab to insert a picture, link, comment, header or footer, or a page number. You can also access the gallery. | Alt+Period, N or Alt+Windows logo key, N |
| Open the tab to set page margins, orientation, and size, and paragraph spacing. | Alt+Period, A or Alt+Windows logo key, A |
| Open the tab to insert a table of contents, footnotes, or endnotes. | Alt+Period, S or Alt+Windows logo key, S |
| Open the tab to check spelling, add comments, or track and review changes to your document. | Alt+Period, R or Alt+Windows logo key, R |
| Open the tab to choose a view, open the pane, edit the , and to the document view. | Alt+Period, W or Alt+Windows logo key, W |
To find an option or perform an action quickly, use the Search text field. To learn more about the Search feature, go to Find what you need with Microsoft Search .
Note: Depending on the version of Microsoft 365 you are using, the Search text field at the top of the app window might be called Tell Me instead. Both offer a largely similar experience, but some options and search results can vary.
Select the item or place in your document, presentation, or spreadsheet where you want to perform an action.
To go to the Search text field, press Alt+Q.
Type the search words for the action that you want to perform. For example, if you want to add a bulleted list, type bullets .
Press the Down arrow key to browse through the search results.
Once you've found the result that you want, press Enter to select it and to perform the action.
Work in the ribbon tabs and menus
The following shortcuts can save time when you work with the ribbon tabs and ribbon menus.
| To do this | Press |
|---|---|
| Select the active tab on the ribbon, and activate the access keys. | Alt+Period or Alt+Windows logo key. To move to a different tab, use an access key or the Tab key. |
| When a Ribbon tab is selected, move the focus to the tab commands. | Enter, then Tab key or Shift+Tab |
| Activate a selected button. | Spacebar or Enter |
| Open the list for a selected command. | Spacebar or Enter |
| Open the menu for a selected button. | Alt+Down arrow key |
| When a menu or submenu is open, move to the next command. | Down arrow key |
| Collapse or expand the ribbon. | Ctrl+F3 |
| To do this | Press |
|---|---|
| Move the cursor right by one word. | Ctrl+Right arrow key |
| Move the cursor left by one word. | Ctrl+Left arrow key |
| Move the cursor up by one paragraph. | Ctrl+Up arrow key |
| Move the cursor down by one paragraph. | Ctrl+Down arrow key |
| Move the cursor to the beginning of the current line. | Home |
| Move the cursor to the end of the current line. | End |
| Move the cursor to the beginning of the document. | Ctrl+Home |
| Move the cursor to the end of the document. | Ctrl+End |
| Select text. | Shift+Arrow keys |
| Select the word to the right. | Shift+Ctrl+Right arrow key |
| Select the word to the left. | Shift+Ctrl+Left arrow key |
| Select the paragraph above. | Shift+Ctrl+Up arrow key |
| Select the paragraph below. | Shift+Ctrl+Down arrow key |
| Select from the current position to the beginning of the line. | Shift+Home |
| Select from the current position to the end of the line. | Shift+End |
| Select from the current position to the beginning of the document. | Shift+Ctrl+Home |
| Select from the current position to the end of the document. | Shift+Ctrl+End |
| Select all document content. | Ctrl+A |
| To do this | Press |
|---|---|
| Cut the selected content to the Clipboard. | Ctrl+X |
| Copy the selected content to the Clipboard. | Ctrl+C |
| Paste the content from the Clipboard. | Ctrl+V |
| Undo the previous action. | Ctrl+Z |
| Redo the previous action. | Ctrl+Y |
| Shrink the font size. | Ctrl+Left bracket ([) |
| Grow the font size. | Ctrl+Right bracket (]) |
| Apply bold formatting to the selected text. | Ctrl+B |
| Apply italic formatting to the selected text. | Ctrl+I |
| Underline the selected text. | Ctrl+U |
| Align the paragraph to the left. | Ctrl+L |
| Align the paragraph to the right. | Ctrl+R |
| Center the paragraph. | Ctrl+E |
| Justify the paragraph. | Ctrl+J |
| Create a bulleted list. | Ctrl+Period (.) |
| Create a numbered list. | Ctrl+Slash (/) |
The following keyboard shortcuts only work when the Comments pane is open and selected (or "in focus" if you're using a screen reader).
| To do this | Press |
|---|---|
| Show or hide the pane. | Alt+Period, R, K or Alt+Windows logo key, R, K |
| Add a new comment. | Ctrl+Alt+M |
| Go to the next comment thread, or the next reply in an expanded comment thread. | Down arrow key |
| Go to the previous comment thread. | Up arrow key |
| Expand the current comment thread. | Right arrow key |
| Collapse the current comment thread. | Left arrow key |
| Move to the reply box, when focus is on a comment. | Tab key, Tab key, Enter |
| Edit a comment or reply, when focus is on the comment or reply. | Tab key, Enter |
| Post a comment/reply or save an edit. | Ctrl+Enter |
| Discard a draft comment/reply or edit. | Esc |
Technical support for customers with disabilities
Microsoft wants to provide the best possible experience for all our customers. If you have a disability or questions related to accessibility, please contact the Microsoft Disability Answer Desk for technical assistance. The Disability Answer Desk support team is trained in using many popular assistive technologies and can offer assistance in English, Spanish, French, and American Sign Language. Please go to the Microsoft Disability Answer Desk site to find out the contact details for your region.
If you are a government, commercial, or enterprise user, please contact the enterprise Disability Answer Desk .

Need more help?
Want more options.
Explore subscription benefits, browse training courses, learn how to secure your device, and more.

Microsoft 365 subscription benefits

Microsoft 365 training

Microsoft security

Accessibility center
Communities help you ask and answer questions, give feedback, and hear from experts with rich knowledge.

Ask the Microsoft Community

Microsoft Tech Community

Windows Insiders
Microsoft 365 Insiders
Find solutions to common problems or get help from a support agent.

Online support
Was this information helpful?
Thank you for your feedback.
How to remap any key on your keyboard in Windows 11 or 10
Turn a key you don't use such as "insert" into one you really need.
Even if you have one of the best gaming keyboards or best mechanical keyboards on the market, you may not have all the keys you want or need. For example, my 96 percent keyboard has a number pad, arrow keys and a function row, but no print screen key.
I do have an insert key, but let's be honest — the last time I needed the insert key was in the 1990s. Fortunately, it's easy to remap any key to become any other key so I can turn insert into print screen or turn my numpad into a series of media buttons.
On some fancier keyboards, you can remap keys at the firmware level; these boards usually have either QMK or Via firmware. And, once you remap it there, the new key assignment will apply across computers and operating systems.
However, most keyboards don't have customizable firmware so the easiest way to remap a key is to do so by tweaking a setting in the OS. In Windows, it's really easy to remap a key by modifying the registry. And you don't even need to go into the registry, because there's a utility called SharpKeys that will write your remaps to the registry for you.
How to Remap a Key Using SharpKeys
1. Install SharpKeys from the Microsoft Store.
2. Launch SharpKeys.
3. Click the Add button.
Stay On the Cutting Edge: Get the Tom's Hardware Newsletter
Get Tom's Hardware's best news and in-depth reviews, straight to your inbox.
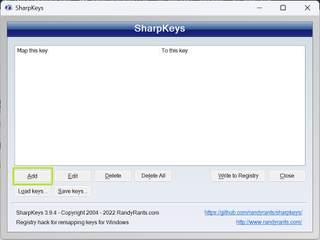
4. Select the key to remap by either picking it in the left-side menu or clicking Type Key and typing it.
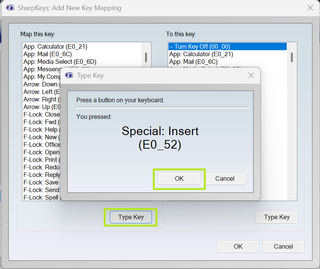
5. Select the key to remap to from the right-side menu and Click Ok .
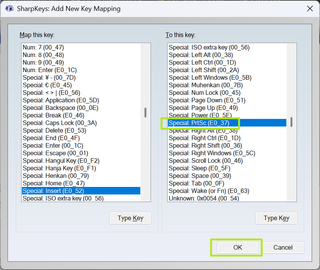
6. Repeat steps 3 to 5 for additional key remaps if you need them.
7. Click Write to Registry .
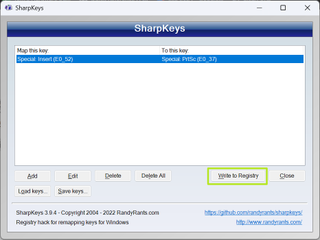
You'll get a confirmation message.
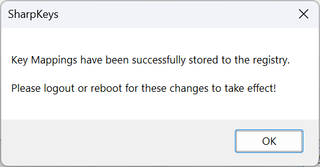
8. Close SharpKeys then reboot your PC or log out then in again.
The new key mappings should work in Windows from now on and you won't need to run SharpKeys again unless you want to do more remaps.
Related Tutorials
- How to use numpad for macros media player
- New Keyboard Shortcuts Every Windows 11 User Should Know
- How to Build a Custom Mechanical Keyboard: A Step-By-Step Guide
- How to Clean Your Keyboard
Microsoft now allows you to reprogram the Windows Copilot key, but there's a catch
Windows 11 24H2 will not arrive for non-Copilot+ PCs on October 8
Steam likely coming to Arm chips with support for hundreds of Windows games — Valve testing ARM64 Proton compatibility layer
Most Popular
Print an Assignment
You can print an assignment by clicking Print Assignment at the top of the Assignment page. Using Print Assignment formats the assignment to remove buttons and line breaks, and often prints using less paper than just using Print on your Web browser.
- Read any notices.
- Enter the assignment password.
- Click Launch Assignment .
Your browser's print function is displayed.
Your printed assignment displays summary information about the assignment, including your name, the instructor name, the class name, class section, class term, assignment category, assignment name, and the time and date the assignment was printed.
- Accessories
- Entertainment
- PCs & Components
- Wi-Fi & Networks
- Newsletters
- Digital Magazine – Subscribe
- Digital Magazine – Info
- Smart Answers
- Back to School
- Best laptops
- Best antivirus
- Best monitors
- Laptop deals
- Desktop PC deals
When you purchase through links in our articles, we may earn a small commission. This doesn't affect our editorial independence .
How to open Windows’ awesome Snipping Tool with a single key press

You can take a screenshot of the entire screen in Windows using the Print key; the key combination Alt+Print captures an image of the currently open window. However, you can also set the Print key to call up the Snipping tool, i.e. the integrated screenshot app of Windows 10 and 11.
In Windows 10, call up Settings via the Start menu and open Ease of Access . Now scroll down in the column on the left and click on Keyboard . In the following window, scroll down again and set the switch for Use the PrtScn button to open screen snipping to On .
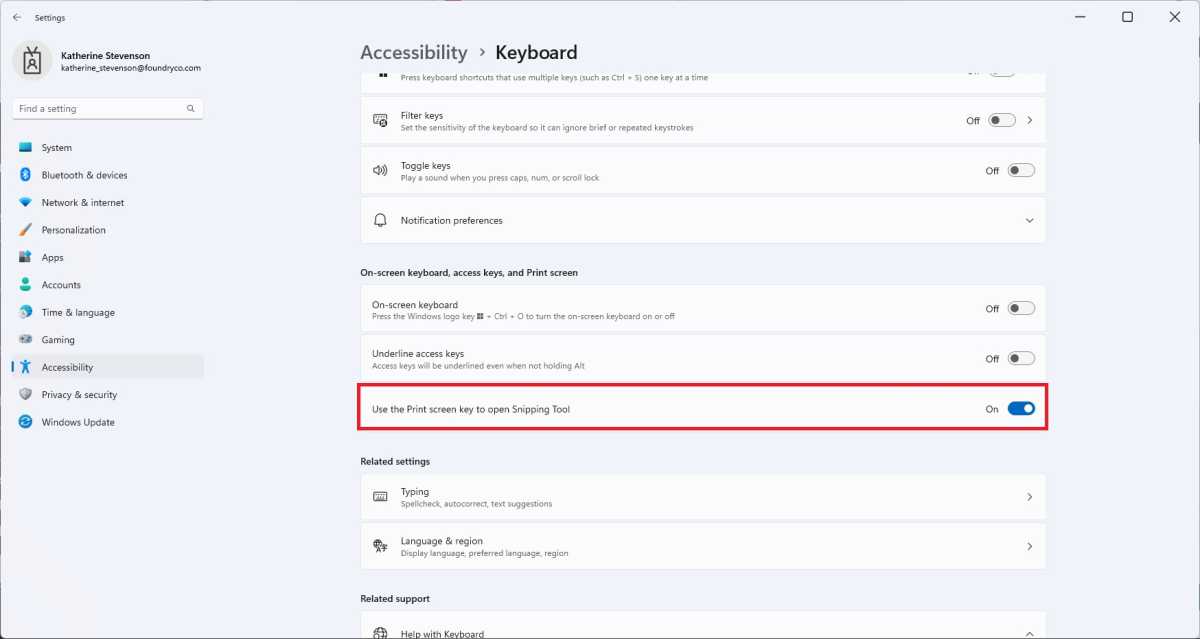
For the change in Windows 11, first open Settings > Accessibility , scroll down to the Interaction section and click on Keyboard there. In the list that follows, you will find the option Use the Print screen key to open the Snipping Tool . After you have set the switch to On , the function is immediately active. Now the Alt+PrtScn key combination no longer has any meaning.
You can now start the snipping tool with the Print key: At the top of the screen you can select whether you want to mark a rectangle, a free form, the current window, or the entire screen. The image outlined with the mouse pointer ends up in the clipboard, from where you can paste it into any graphics program. A click on the preview in the bottom right-hand corner transfers the data to the workspace of the snipping tool.
get windows 11 pro cheap in pcworld's software store
Windows 11 pro.
This article was translated from German to English and originally appeared on pcwelt.de.
Author: Roland Freist

Roland Freist bearbeitet als freier IT-Fachjournalist Themen rund um Windows, Anwendungen, Netzwerke, Security und Internet.
Recent stories by Roland Freist:
- How to disable ads for apps in Windows 11’s Start menu
- Is your PC slowing down? Here’s how to find the problem
- How to change what Windows does when you plug in a flash drive
How-To Geek
How to remap any key or shortcut on windows 10.

Your changes have been saved
Email is sent
Email has already been sent
Please verify your email address.
You’ve reached your account maximum for followed topics.
Quick Links
Remap keys with powertoys, how to remove the new key mapping, how to disable or remap keys using sharpkeys [alternative method], use your keyboard's software to remap keys, key takeaways.
Install Microsoft PowerToys from GitHub, launch it, and then navigate to Keyboard Manager > Remap a Key. Click the plus button, and then select the key you want to rebind from the list. You can click the trash can icon to remove a remapping at any time.
Would you like to use a different keyboard key to perform a certain task in Windows 10? Thanks to PowerToys , it's easy to remap any key to another key or even a shortcut combination on your keyboard. Here's how to set it up.
Microsoft makes it easy to remap keys with PowerToys , a free utility available for download online. Using PowerToys, you can make any key on your keyboard act like any other key — and even remap shortcuts.
If you don't already have PowerToys installed, download it for free from Github. After you install it, launch PowerToys Settings, then click "Keyboard Manager" in the sidebar. In the "Keyboard Manager" settings, click "Remap a Key."
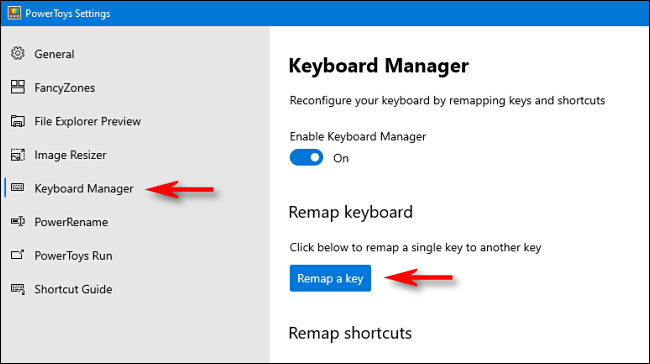
When the "Remap Keyboard" window pops up, click the plus button ("+") to add a new key mapping.
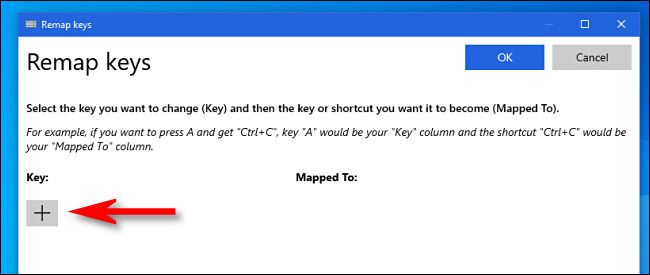
After that, you'll need to define which key you want to remap (in the "Key:" column), and what key or shortcut you want it to perform (in the "Mapped To:" column).
First, select the key you'll be remapping in the "To:" column by either clicking the "Type" button and pressing the key on your keyboard, or by selecting it from the list in the drop-down menu. For example, we'll pick Scroll Lock here, since it often sits unused.
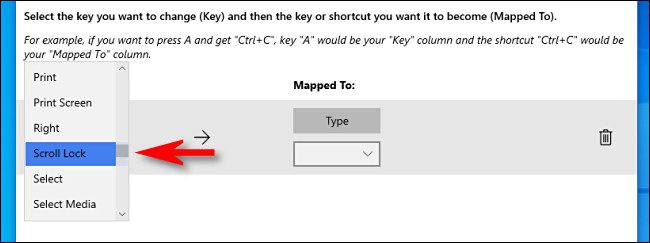
Next, select the key or shortcut you want to perform in the "Mapped To" column. For a single key, you can either choose it from the drop-down menu or click the "Type" button, then press it on your keyboard.
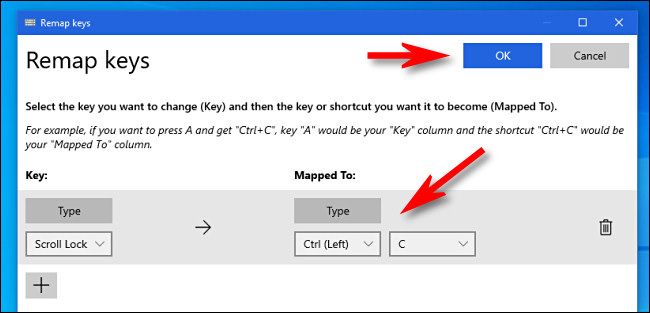
If you want to use a shortcut key combination, press the "Type" button, then press the combination on your keyboard. For example, here we've typed "Ctrl+C" for the standard Windows "Copy" shortcut.
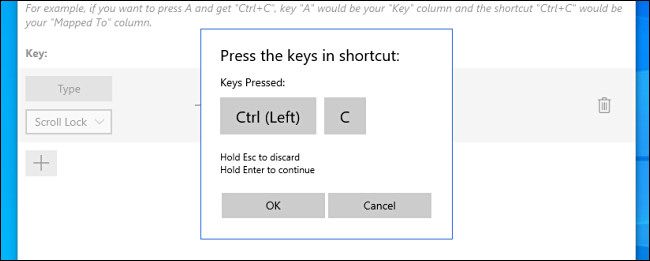
After you have both "Key:" and "Mapped To:" columns defined, click "OK."
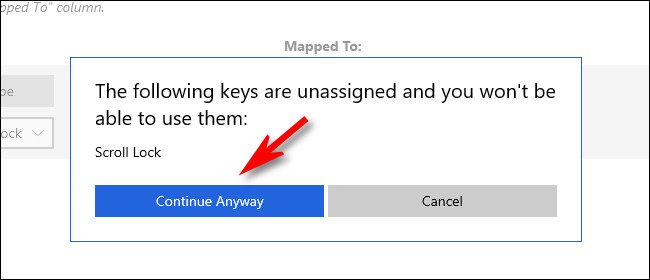
If you see a warning that one key will be left unassigned, click "Continue Anyway." This means that you won't be able to access the original function of the key that you just remapped.
(In our example, there will be no way to use Scroll Lock unless you remap another key to perform the original Scroll Lock function).
Next, you'll see the resulting mapping listed in the "Keyboard Manager" settings. That means your custom mapping has been saved and is now active.
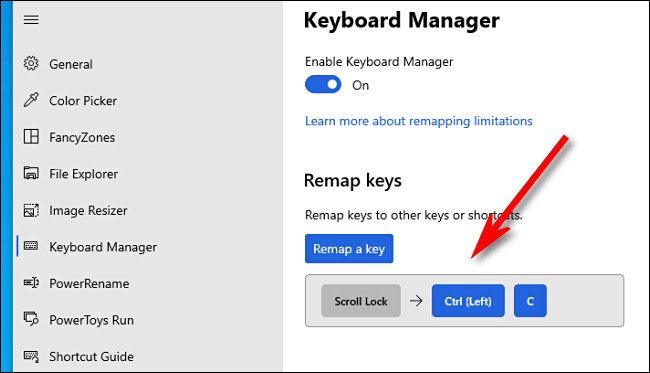
If you want to add more mappings, click "Remap a key" again. When you're done, close PowerToys Settings completely, and your remapped key (or keys) will remain in effect. Use them as much as you'd like. You can always go back and adjust your mappings later if necessary.
Later on, if you want to remove the custom mapping you made, relaunch Power Toys Settings, then click "Keyboard Manager" and "Remap a key" again. In the list of mappings, click the trash can icon beside the mapping you'd like to delete.
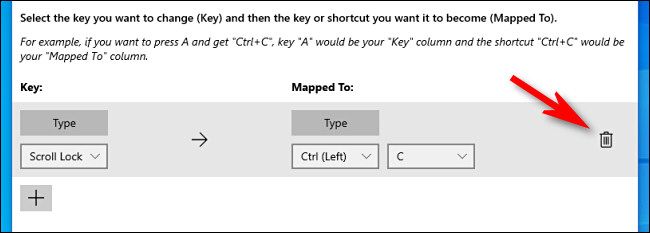
The mapping will be removed. After that, click "OK" to close the window. Then you can either exit PowerToys completely or create a new mapping using the guide above. Have fun!
The major problem with PowerToys is that the remappings only work if the PowerToys application is running, so they won't work on the login screen. There also seem to be issues with the remappings not working properly in games and some other places. The solution? Use the old-school Windows Registry key remapping technique... but do it the easy way, using the open-source SharpKeys application.
SharpKeys won't let you remap shortcut key combinations, so you can't remap ALT+C to CTRL+C, for example, but you can do things like remap or disable the Caps Lock key on any version of Windows .
Install the application from their Github project page or from the Microsoft Store , open it up (clicking through the annoying Windows SmartScreen warnings), and then click the Add button to open up the Add New Key Mapping dialog.
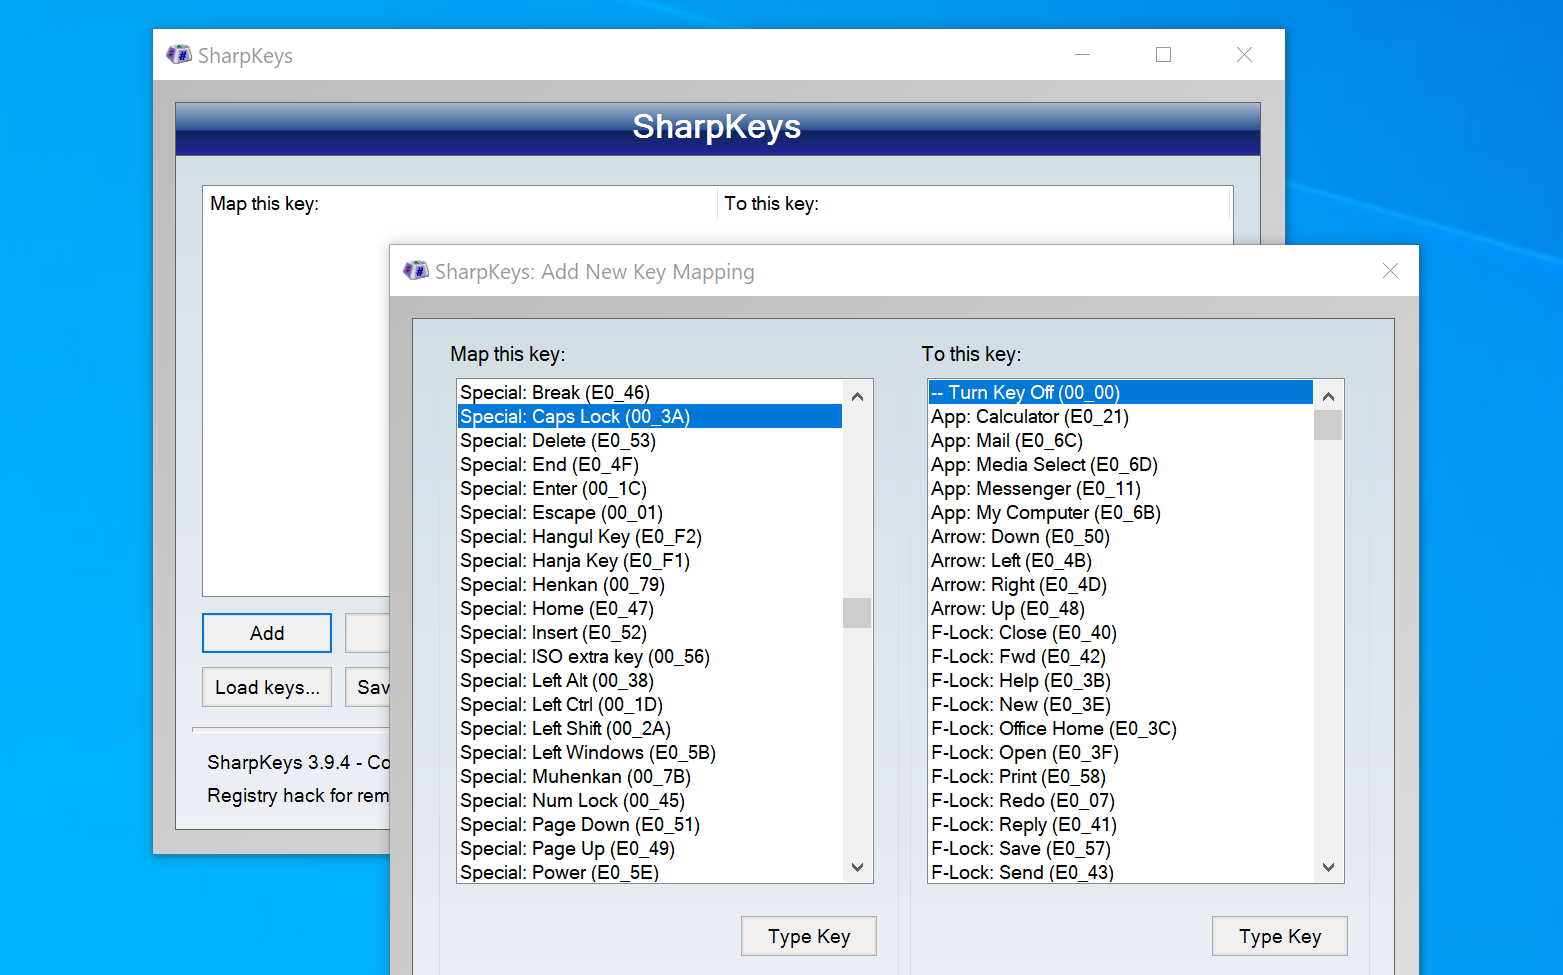
We've been using SharpKeys literally since Windows Vista was around. That's a long time.
Many modern keyboards also have special software that allows you to remap keys as well. Since all of their software is different we can't definitively say "Here is how you do it." Generally speaking, you'll be looking for an option like "Customize," "Keybind," "Bind," or "Remap."
Here is a quick list to some of the specialized software available for different keyboard brands, though keep in mind that this is not an exhaustive list.
- Logitech G Hub
- Corsair iCUE
- SteelSeries Engine
- Razer Synapse
- HyperX NGENUITY
- Roccat Swarm
Your keyboard software probably lets you do other things besides modify keybinds. For example, if your keyboard has extra keys, or RGB, the manufacturer software is typically required to utilize them.
- PC Optimization
Microsoft is CHANGING what the 'Print Screen' key does on Windows 11 — here's how to change it back
Print Screen is evolving, but there's an easy way to change it back.

What you need to know
- Microsoft is changing the default behavior of the "Print Screen" key
- In an upcoming update, the Print Screen key will be changed to launch the Snipping Tool instead.
- Luckily, Microsoft will allow users to switch back to the old behavior if they want to.
Microsoft is planning to change the default behavior of the print screen button on Windows 11 , which will open Microsoft's new Snipping Tool experience instead of taking an instant screengrab of your desktop. It's a behavior change that may take some getting used to, and luckily, it's something you can switch back.
In fact, this is a setting that Microsoft has had available on Windows 11 for a long while. It's an optional accessibility feature, which can be accessed by heading to Settings > Accessibility > Keyboard and toggling "Use the Print screen key to open Snipping Tool."
Currently, this setting is off by default, but an upcoming Windows 11 update will enable this toggle for everyone , changing the default behavior of the print screen key to launch Snipping Tool instead. We think this is an improvement, as the Snipping Tool offers a wider variety of screenshot types, including window-only, full-screen, and freeform mode.
However, if you're not a fan of this change, the good news is this option is remaining in the Settings app. All you have to do is head to the aforementioned Settings area and toggle it back off, which will restore the classic functionality of the Print screen button.
How to change what the Print Screen key does on Windows 11
- Open Windows Settings
- Select the "Accessibility" category in the left-hand sidebar
- Select the " Keyboard" setting
- Scroll down until you find the "Use the Print screen key to open Snipping Tool" setting
- Toggle the setting on or off
Microsoft has slowly but surely been updating legacy experiences with modern equivalents on Windows 11, and the behavior of the Print Screen button is the latest to get an update. Snipping Tool on Windows 11 was recently updated to include a screen recording mode for the first time too, bringing it in-line with other operating systems.
Get the Windows Central Newsletter
All the latest news, reviews, and guides for Windows and Xbox diehards.
Zac Bowden is a Senior Editor at Windows Central. Bringing you exclusive coverage into the world of Windows on PCs, tablets, phones, and more. Also an avid collector of rare Microsoft prototype devices! Keep in touch on Twitter and Threads
- 2 "We’re building plans for the 25th anniversary of Halo and Xbox," Microsoft confirms in a new interview. "We have such a rich heritage, you have to celebrate that."
- 3 That sweet Helldivers 2 Halo Infinite mode is closer than ever — here's how it works and when a release date is coming
- 4 Qualcomm reportedly wants to buy Intel in a potential takeover that would shake up chip industry
- 5 Minecraft's official PS5 version has a release date and, no, there won't be ray tracing
Adobe Community
- Global community
- 日本語コミュニティ Dedicated community for Japanese speakers
- 한국 커뮤니티 Dedicated community for Korean speakers
- Premiere Pro
- Discussions
- Re: Shortcut Key Assignment Issue
Shortcut Key Assignment Issue

Copy link to clipboard
1 Correct answer

never-displayed
How to enable (or disable) Snipping Tool Print Screen key on Windows 11
You can change the Print Screen key action to open the Snipping Tool or another screenshot-taking app, and here's how.
On Windows 11 , the system remaps the Print Screen (Prt Scr) key to the Snipping Tool by default to make it easier to take screenshots. However, if you want to use another app, you will notice that it won’t be able to register the print key on the keyboard, but you can always change this behavior for any reason, including if you’re comfortable using the previous default “Windows key + Shift + S” keyboard shortcut.
In the same way, if pressing the Print Screen key doesn’t open the Snipping Tool interface, you can change the “Accessibility” settings to open the screen capture tools more easily by pressing one key instead of using a shortcut.
In this guide , I will teach you how to change the Windows 11 settings to enable or disable the Print Screen key to bring up the Snipping Tool interface to take screenshots on Windows 11 .
Disable Snipping Tool shortcut on Windows 11
Enable snipping tool shortcut on windows 11.
To disable the Snipping Tool Print Screen key shortcut on Windows 11, use these steps:
Open Settings .
Click on Accessibility .
Click the Keyboard page.
Turn off the “Use the Print screen key to open screen capture” toggle switch.

Once you complete the steps, the Snipping Tool will default to the “Windows key + Shift + S” keyboard shortcut to bring up the screen capture tools, and you can now assign the “Print Screen” key to another screenshot application.
If you’re assigning the Print Screen key to another app (such as Lightshot, Greeshot, etc.), you may need to restart the app or the computer to apply the changes.
To use the keyboard’s Print key instead of the “Windows key + Shift + S” shortcut to bring up the menu, use these steps:
Turn on the “Use the Print screen key to open screen capture” toggle switch.

Once you complete the steps, press the Print Screen button instead of the “Windows key + Shift + S” keyboard shortcut to quickly take a screenshot on Windows 11.
Mauro Huculak is a Windows How-To Expert who started Pureinfotech in 2010 as an independent online publication. He has also been a Windows Central contributor for nearly a decade. Mauro has over 15 years of experience writing comprehensive guides and creating professional videos about Windows and software, including Android and Linux. Before becoming a technology writer, he was an IT administrator for seven years. In total, Mauro has over 21 years of combined experience in technology. Throughout his career, he achieved different professional certifications from Microsoft (MSCA), Cisco (CCNP), VMware (VCP), and CompTIA (A+ and Network+), and he has been recognized as a Microsoft MVP for many years. You can follow him on X (Twitter) , YouTube , LinkedIn and About.me . Email him at [email protected] .
- How to uninstall Snipping Tool app on Windows
- How to enable BitLocker on Windows 11
We hate spam as much as you! Unsubscribe any time Powered by follow.it ( Privacy ), our Privacy .

- > Word Tips
- > Printing

Printing a Key Assignment List
Written by Allen Wyatt (last updated October 23, 2021) This tip applies to Word 2007, 2010, 2013, 2016, 2019, and Word in Microsoft 365
When you are customizing Word, you can assign certain styles, macros, and commands to different key assignments. Word allows you to print a list of what has been assigned to certain keys. To do this, follow these steps if you are using Word 2010 or a later version:
- Press Ctrl+P . Word displays the File tab of the ribbon, with the Print option selected at the left side of the screen.
- Click the first option under the Settings category and choose Key Assignments. (You may have to scroll down through the list to find it.) (See Figure 1.)
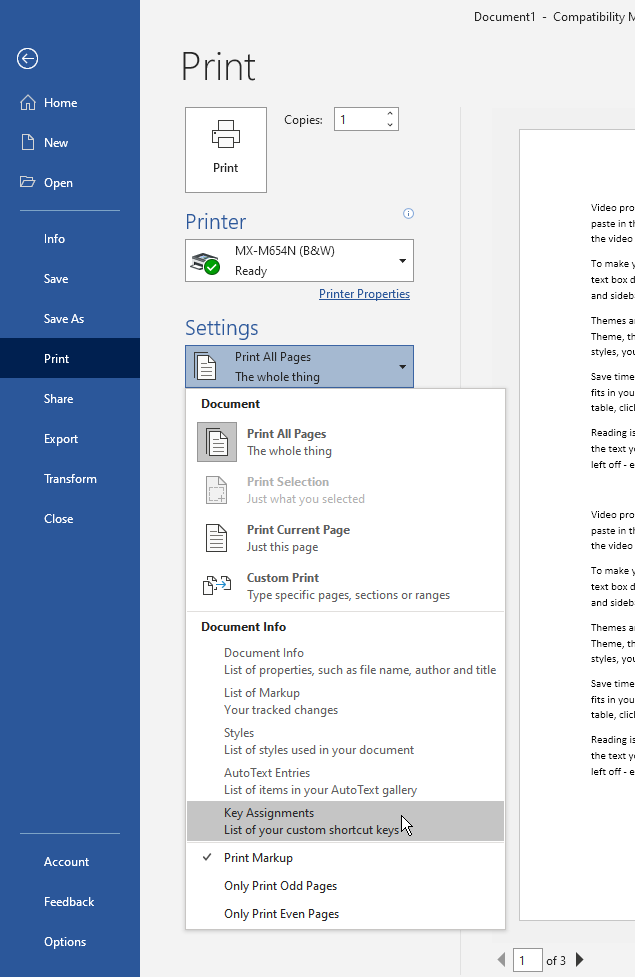
Figure 1. Specifying you want to print key assignments.
- Click the Print button. Word prints the desired information.
If you are using Word 2007, follow these steps, instead:
- Press Ctrl+P . Word displays the Print dialog box. (See Figure 2.)
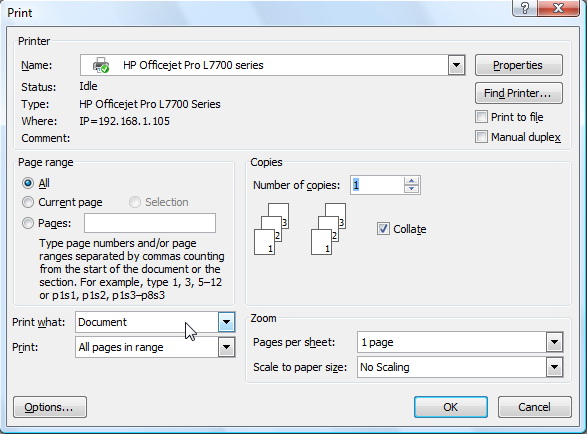
Figure 2. The Print dialog box.
- In the Print What box, select Key Assignments.
- Click on OK.
WordTips is your source for cost-effective Microsoft Word training. (Microsoft Word is the most popular word processing software in the world.) This tip (9256) applies to Microsoft Word 2007, 2010, 2013, 2016, 2019, and Word in Microsoft 365. You can find a version of this tip for the older menu interface of Word here: Printing a Key Assignment List .
Allen Wyatt
With more than 50 non-fiction books and numerous magazine articles to his credit, Allen Wyatt is an internationally recognized author. He is president of Sharon Parq Associates , a computer and publishing services company. Learn more about Allen ...
MORE FROM ALLEN
Specifying Superscript Text
Applying different formatting to the text within a cell can seem a bit confusing. This is certainly the case when it ...
Making Banners in Word
Word can be used for printing a variety of document types. You may want to use the program to print a festive banner for ...
Calculating a Geometric Standard Deviation
One of the areas in which Excel provides worksheet functions is in the arena of statistical analysis. You may want to ...

Comprehensive VBA Guide Visual Basic for Applications (VBA) is the language used for writing macros in all Office programs. This complete guide shows both professionals and novices how to master VBA in order to customize the entire Office suite for their needs. Check out Mastering VBA for Office 2010 today!
More WordTips (ribbon)
Two Printed Copies to Different Paper Trays
Many modern printers include multiple paper trays that can be used for different types or colors of paper. Word allows ...
Selecting a Paper Source
If your printer allows you to specify different paper trays as sources for paper, you need to know how to select those ...
Printing Just the Changes and Comments
Word allows you to use its Track Changes feature to add markup to your document. This is great when you have a group of ...
FREE SERVICE: Get tips like this every week in WordTips, a free productivity newsletter. Enter your address and click "Subscribe."
View most recent newsletter.
(Your e-mail address is not shared with anyone, ever.)
If you would like to add an image to your comment (not an avatar, but an image to help in making the point of your comment), include the characters [{fig}] (all 7 characters, in the sequence shown) in your comment text. You’ll be prompted to upload your image when you submit the comment. Maximum image size is 6Mpixels. Images larger than 600px wide or 1000px tall will be reduced. Up to three images may be included in a comment. All images are subject to review. Commenting privileges may be curtailed if inappropriate images are posted.
(gif, jpeg or png only, 5MB maximum file size)
Notify me about new comments ONLY FOR THIS TIP
Notify me about new comments ANYWHERE ON THIS SITE
Hide my email address
What is one more than 4?
2022-02-02 09:43:31
Watt, try this in a macro: Application.ListCommands False Andy.
2022-02-01 13:55:07
Didn't there used to be a way to create a **file** (doc file) of key assignments? What good is a hard copy nowadays?
2021-10-23 08:28:43
Thank you for this tip. I was looking for a way to do this for some time, and this came very handy. On my machine I found keys ***still*** assigned to old macros as well as to styles that I have deleted. This enabled me to do some cleanup.
Got a version of Word that uses the ribbon interface (Word 2007 or later)? This site is for you! If you use an earlier version of Word, visit our WordTips site focusing on the menu interface .
Visit the WordTips channel on YouTube

View the most recent newsletter.
Links and Sharing
- WordTips FAQ
- Questions or Comments
- Great Branding Ideas
- Free Calendars
OUR COMPANY
- Sharon Parq Associates, Inc.
- About Tips.Net
- Advertise with Us
- Our Privacy Policy
- Author Index
OUR PRODUCTS
- Helpful E-books
- Newsletter Archives
- Video Courses
- Excel Products
- Windows Products
- Word Products
- Beauty and Style
- ExcelTips (Excel 97–2003)
- ExcelTips (Excel 2007–2021; 365)
- Home Improvement
- Money and Finances
- Pests and Bugs
- Pets and Animals
- WindowsTips (Microsoft Windows)
- WordTips (Word 97–2003)
- WordTips (Word 2007–2021; 365)
Copyright © 2024 Sharon Parq Associates, Inc.

- > Word Tips
- > Printing

Printing a Key Assignment List
Written by Allen Wyatt (last updated August 10, 2024) This tip applies to Word 97, 2000, 2002, and 2003
When you are customizing Word, you can assign certain styles, macros, and commands to different key assignments. Word allows you to print a list of what has been assigned to certain keys. To do this, follow these steps:
- Select Print from the File menu or press Ctrl+P . Word displays the Print dialog box. (See Figure 1.)
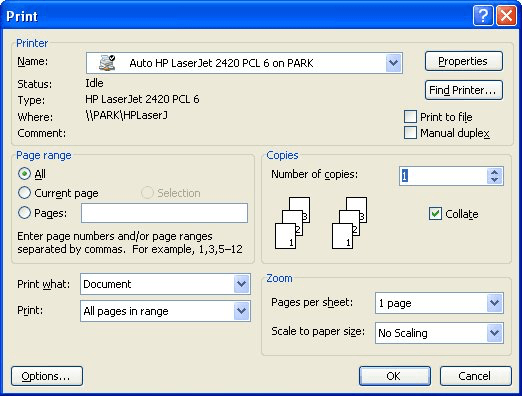
Figure 1. The Print dialog box.
- In the Print What box, select Key Assignments.
- Click on OK.
WordTips is your source for cost-effective Microsoft Word training. (Microsoft Word is the most popular word processing software in the world.) This tip (1147) applies to Microsoft Word 97, 2000, 2002, and 2003. You can find a version of this tip for the ribbon interface of Word (Word 2007 and later) here: Printing a Key Assignment List .
Allen Wyatt
With more than 50 non-fiction books and numerous magazine articles to his credit, Allen Wyatt is an internationally recognized author. He is president of Sharon Parq Associates , a computer and publishing services company. Learn more about Allen ...
MORE FROM ALLEN
Repeating Rows on a Printout Except On the Last Page
When setting up a worksheet for printing, you can specify that Excel repeat some of your rows at the top of each page ...
Discovering Dependent Workbooks
When you starting linking information from one workbook to another, those workbooks become dependent on each other. ...
Dealing with Text Length Limits and AutoFilter Drop-Down Lists
Excel has some built-in limits on what you can do with the program. When you run into those limits, it can be frustrating ...

Create Custom Apps with VBA! Discover how to extend the capabilities of Office 2013 (Word, Excel, PowerPoint, Outlook, and Access) with VBA programming, using it for writing macros, automating Office applications, and creating custom applications. Check out Mastering VBA for Office 2013 today!
More WordTips (menu)
Printing a List of AutoCorrect Entries
Want a printed record of the AutoCorrect entries you've created in Word? There is no built-in way to do it, but you can ...
Using Duplex Printing
Want to print on both sides of a piece of paper? Some printers have the capability to do two-sided printing ...
Suppressing ASK Fields When Printing
Do you like using ASK Fields in your documents to get information from the user but don't want Word to update the fields ...
FREE SERVICE: Get tips like this every week in WordTips, a free productivity newsletter. Enter your address and click "Subscribe."
View most recent newsletter.
(Your e-mail address is not shared with anyone, ever.)
If you would like to add an image to your comment (not an avatar, but an image to help in making the point of your comment), include the characters [{fig}] (all 7 characters, in the sequence shown) in your comment text. You’ll be prompted to upload your image when you submit the comment. Maximum image size is 6Mpixels. Images larger than 600px wide or 1000px tall will be reduced. Up to three images may be included in a comment. All images are subject to review. Commenting privileges may be curtailed if inappropriate images are posted.
(gif, jpeg or png only, 5MB maximum file size)
Notify me about new comments ONLY FOR THIS TIP
Notify me about new comments ANYWHERE ON THIS SITE
Hide my email address
What is one more than 4?
There are currently no comments for this tip. (Be the first to leave your comment—just use the simple form above!)
Got a version of Word that uses the menu interface (Word 97, Word 2000, Word 2002, or Word 2003)? This site is for you! If you use a later version of Word, visit our WordTips site focusing on the ribbon interface .
Visit the WordTips channel on YouTube

View the most recent newsletter.
Links and Sharing
- WordTips FAQ
- Questions or Comments
- Great Branding Ideas
- Free Calendars
OUR COMPANY
- Sharon Parq Associates, Inc.
- About Tips.Net
- Advertise with Us
- Our Privacy Policy
- Author Index
OUR PRODUCTS
- Helpful E-books
- Newsletter Archives
- Video Courses
- Excel Products
- Windows Products
- Word Products
- Beauty and Style
- ExcelTips (Excel 97–2003)
- ExcelTips (Excel 2007–2021; 365)
- Home Improvement
- Money and Finances
- Pests and Bugs
- Pets and Animals
- WindowsTips (Microsoft Windows)
- WordTips (Word 97–2003)
- WordTips (Word 2007–2021; 365)
Copyright © 2024 Sharon Parq Associates, Inc.
- Dell Technologies
- Premier Sign In
- Partner Program Sign In
- Dell Financial Services
Welcome to Dell
- Place orders quickly and easily
- View orders and track your shipping status
- Enjoy members-only rewards and discounts
- Create and access a list of your products
Your Dell.com Carts
How to use the print screen key to take a screenshot in microsoft windows, summary: find information about how to use the print screen key in microsoft windows to take a screenshot in windows 11 and windows 10., detailed article, instructions, affected products, table of contents, what is the print screen key and how does it work, where is the print screen key on my device.
- Use the Print Screen key to take a screenshot
Paste the screenshot to use or edit in an application
Capturing a snapshot of your computer screen is called a screenshot or screen capture. Once captured, the screenshot is automatically copied to your clipboard in Windows. Windows uses the Print Screen key, either alone or with another key, to capture one of the following:
- The entire screen
- All active windows
- The current active window
You can then paste the screenshot into a document, email message, file, or image editor (Paint, for example). Alternately, you can insert the screenshot as an image into a document, email message, another file, or image editor.
On desktop keyboards, the Print Screen key is typically located in the upper right corner of the keyboard. Some keyboard models label the Print Screen key differently, such as PrintScreen , PrntScrn , PrntScr , PrtScn , PrtScr , PrtSc , or a similar abbreviation. In this article, we use the PrntScrn abbreviation to represent any key label variations.
On laptop keyboards, the Print Screen key is typically located on the Function Key row. Press the Fn key together with the associated Function key (usually F10) initiates the screenshot.
Laptops with capacitive (illuminated) Function Key rows should press the Fn key to toggle between the functions of the keys to locate the Print Screen key. Once illuminated, press the PrntScrn key along with any of the options below to capture the relevant screenshot. Refer to your product's user guide for more information.
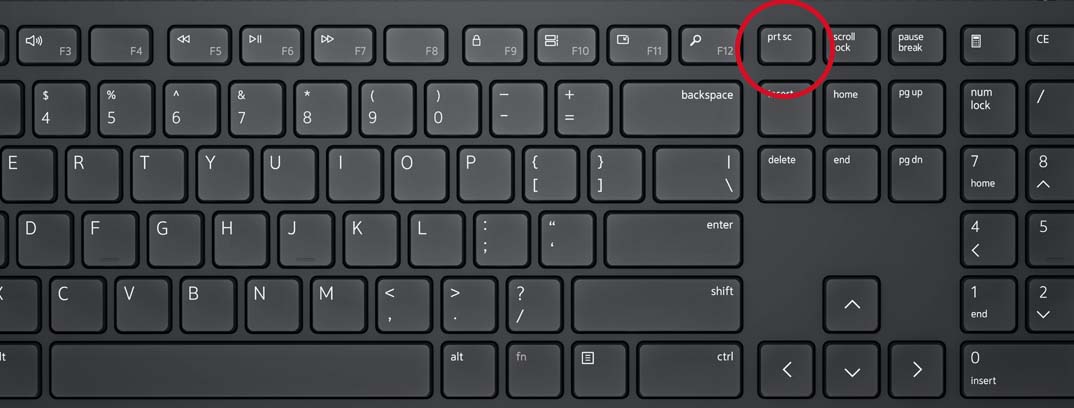
The Print Screen function operates slightly differently in each Windows operating system.
Using the Print Screen Key in Windows 11 and Windows 10
To capture the entire screen:.
Press the Windows logo key + PrntScrn key together. On tablets, press the Windows logo button + the volume down button together. (The screenshot is saved in the Screenshots folder in the Pictures folder.)
To capture all active windows:
Press the PrntScrn key.
To capture a single active window:
Select the window that you want to capture and press the Alt + PrntScrn keys together.
Once you have captured the wanted screen or window using the Print Screen key, you must take additional steps to retain the screenshot. Paste the captured image into an image editor such as Microsoft Paint or Photoshop to edit or save it. Open the appropriate application and use the Ctrl + V key combination to paste the image into a new image document.

Article Properties
Find answers to your questions from other dell users, support services.

IMAGES
VIDEO
COMMENTS
Word allows you to print a list of what has been assigned to certain keys. To do this, follow these steps if you are using Word 2010 or a later version: Press Ctrl+P. Word displays the File tab of the ribbon, with the Print option selected at the left side of the screen. Click the first option under the Settings category and choose Key Assignments.
Press Ctrl+P to display the Print option selected at the left side of the page. Click the drop down arrow under the Settings category and choose Key Assignments. Click the Print button at the top of the page. Print a Key Assignment List in Older Versions of Word Word 2007: Press Ctrl+P. Word displays the Print dialog box.
Word provides the ability to print a list of custom key assignments under the Print menu. This has been the case as long as I can remember. However, recent versions of Word scramble them. Here is a printout from Word 2013. Here is a similar printout from Word 2019 (365) (I cut off the ones from the normal template, but they are similarly scrambled.
Select Print from the File menu. Word displays the Print dialog box. (See Figure 1.) Figure 1. The Print dialog box. Using the Print What drop-down list, select Key Assignments. Click your mouse on OK. WordTips is your source for cost-effective Microsoft Word training. (Microsoft Word is the most popular word processing software in the world.)
I want Word to automatically create a document that lists all my "global key assignments" that I've customized. I know this can be done; I did it in Word X years ago, but can't remember how to do it
Key assignments to macros are not shown and if a keyboard shortcut has been assigned to a macro and was previously assigned to a command, the command will be shown with the shortcut even though over-ridden by the assignment to the macro. Method 2: A list of custom keyboard shortcuts stored in a document or template.
One method of doing this is to print out (either on paper or to a PDF file) a list of the key assignments for the currently active document and template. To generate this list, click the "File" tab. On the backstage screen, click "Print" in the list of options on the left.
Moreover, the key log is a document that is used to track and monitor all the keys that a certain organization has. In addition, the key log template also consists of a page that has various sections for providing information about the issuance of keys. It allows you to include the following information; Name of a person; Key number
Use the arrow keys to place the cursor where you want to copy the text or graphic, and then press Enter to copy, or press Esc to cancel. Ctrl+F2: displays the print preview area on the Print tab in the Backstage view. Alt+Shift+F2: saves the document. Ctrl+Alt+F2: displays the Open dialog box. F3.
Select the key to remap by either picking it in the left-side menu or clicking Type Key and typing it. (Image credit: Future) 5. Select the key to remap to from the right-side menu and Click Ok ...
Note Assignments that include large tables, large graphics, or complex layouts wider than the Print Assignment output format might not print as expected. Line breaks might be displayed oddly or text or graphics might be truncated.
In Windows 10, call up Settings via the Start menu and open Ease of Access. Now scroll down in the column on the left and click on Keyboard. In the following window, scroll down again and set the ...
After you install it, launch PowerToys Settings, then click "Keyboard Manager" in the sidebar. In the "Keyboard Manager" settings, click "Remap a Key." When the "Remap Keyboard" window pops up, click the plus button ("+") to add a new key mapping. After that, you'll need to define which key you want to remap (in the "Key:" column), and what key ...
The option to change what the print screen key does. (Image credit: Windows Central) Open Windows Settings; Select the "Accessibility" category in the left-hand sidebar; Select the "Keyboard ...
Word displays the File tab of the ribbon, with the Print option selected at the left side of the screen. Click the first option under the Settings category and choose Key Assignments. (You may have to scroll down through the list to find it.) (See Figure 1.) Figure 1. Specifying you want to print key assignments. Click the Print button.
Hi, I'm having an issue with my Shortcut Keys, wondering if anyone can help me figure out what's going on here. I previously had my "Home" key set to Navigate to start of segment. and my "End" key set to Navigate to end of segment. Today i realized that neither of those shortcut keys we're working properly
Word allows you to print a list of what has been assigned to certain keys. To do this, follow these steps: Select Print from the File menu or press Ctrl+P. Word displays the Print dialog box. (See Figure 1.) Figure 1. The Print dialog box. In the Print What box, select Key Assignments. Click on OK.
Enable Snipping Tool shortcut on Windows 11. To use the keyboard's Print key instead of the "Windows key + Shift + S" shortcut to bring up the menu, use these steps: Open Settings. Click on Accessibility. Click the Keyboard page. Turn on the "Use the Print screen key to open screen capture" toggle switch. Once you complete the steps ...
The Print dialog box. Using the Print What drop-down list, choose Key Assignments. Click OK. If you are using Word 2010 or a later version, then the steps are slightly different: Press Ctrl+P to display the printing options on the File tab of the ribbon. Click the Print What button, which is the first button under the Settings heading.
Word allows you to print a list of what has been assigned to certain keys. To do this, follow these steps if you are using Word 2010 or a later version: Press Ctrl+P. Word displays the File tab of the ribbon, with the Print option selected at the left side of the screen. Click the first option under the Settings category and choose Key Assignments.
Word allows you to print a list of what has been assigned to certain keys. To do this, follow these steps: Select Print from the File menu or press Ctrl+P. Word displays the Print dialog box. (See Figure 1.) Figure 1. The Print dialog box. In the Print What box, select Key Assignments. Click on OK.
Press the Fn key together with the associated Function key (usually F10) initiates the screenshot. Laptops with capacitive (illuminated) Function Key rows should press the Fn key to toggle between the functions of the keys to locate the Print Screen key. Once illuminated, press the PrntScrn key along with any of the options below to capture the ...
The key does *not* print the screen. PrtScrn captures the whole screen, and Alt-PrtScrn captures the active window. Either one captures the image to the Windows clipboard. Once it's in the clipboard you can paste (Ctrl-V) it into any application that supports graphics (Windows Paint, other graphics programs, even your favorite word processor).
Harassment is any behavior intended to disturb or upset a person or group of people. Threats include any threat of violence, or harm to another.